Integrated Credit Card Payments
Getting Started with Payments
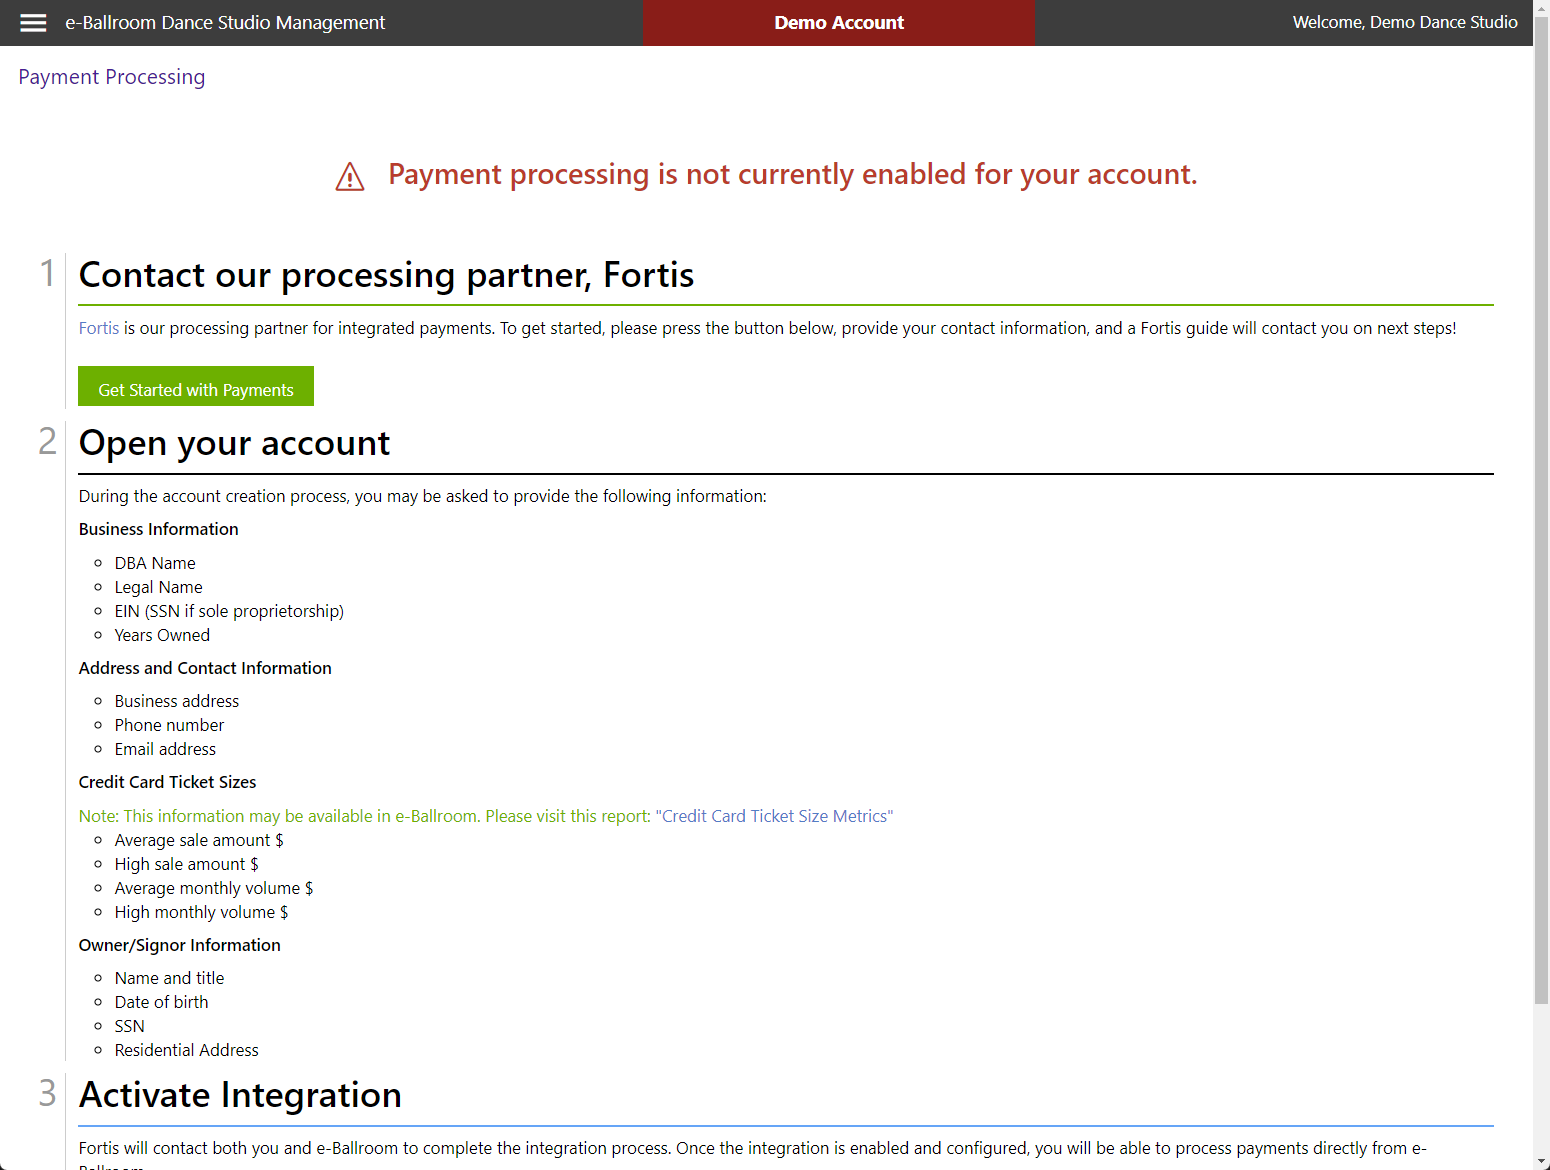
e-Ballroom has partnered with Fortis for integrated payments. To begin taking payments within e-Ballroom, please contact Fortis at https://hubs.ly/Q02lR1cf0.
Alternatively, visit Payment Processing > Processor Settings in the e-Ballroom console. Click the “Get Started with Payments” button and complete the form to setup your Fortis account.
Saving a Card to a Customer’s File
There are two ways to save a card to the customer’s file. The first option is to navigate to Payment Processing > Save Credit Card to File.
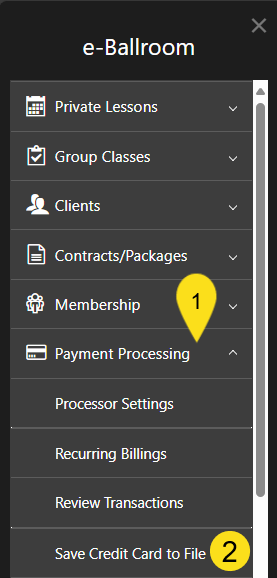
When ready, select the client name in the drop down list and press “Go”.

The second is to open the client up and view their profile. Navigate to Clients > View/Edit Existing Clients. Locate the client and open their profile. Then press “Save Credit Card” tab.
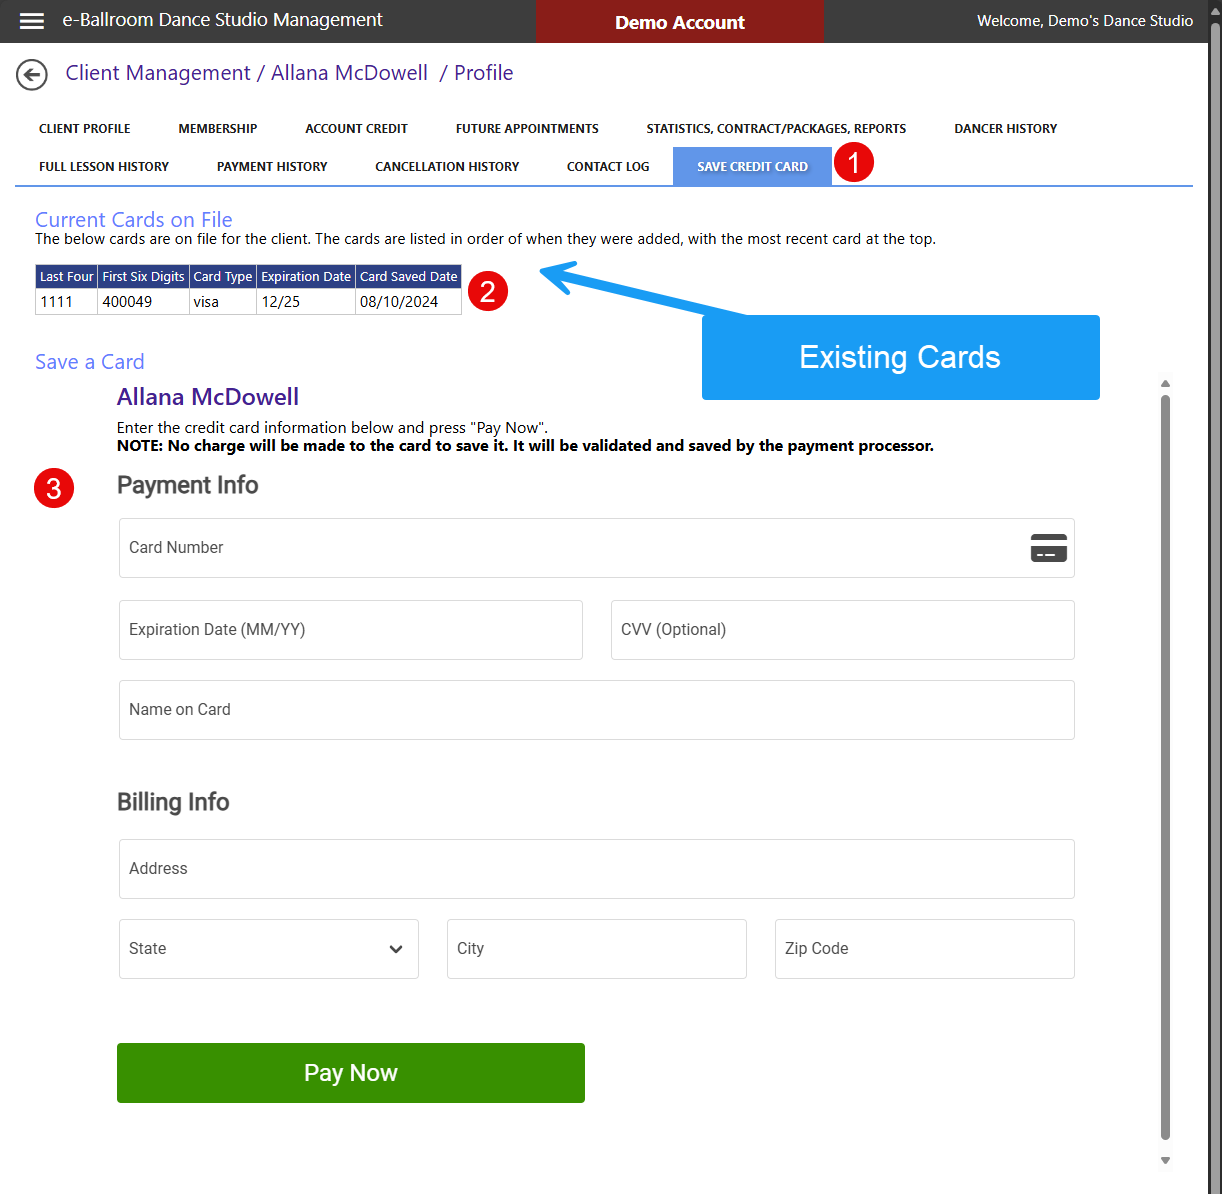
Saving the card is functionally the same regardless of which of the two methods you use to save the card.
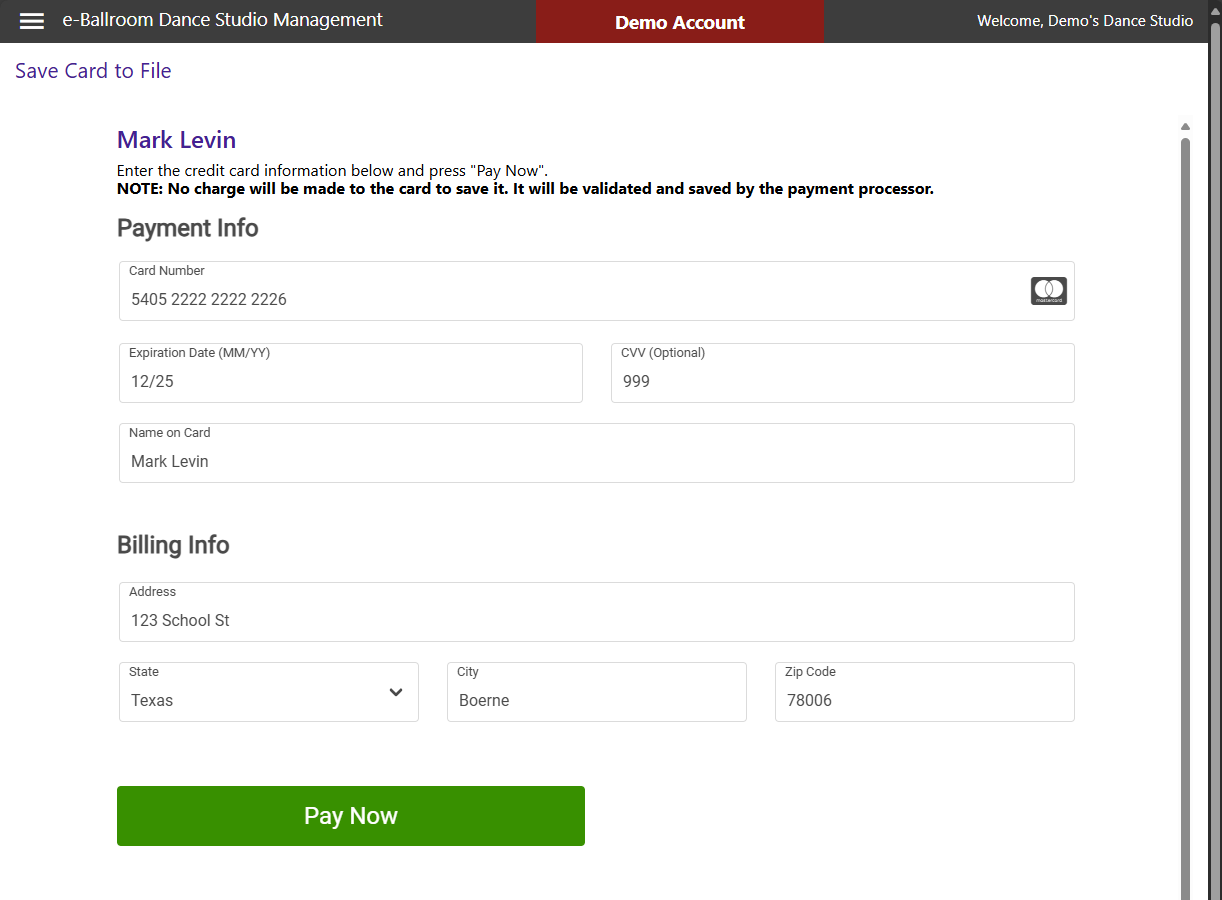
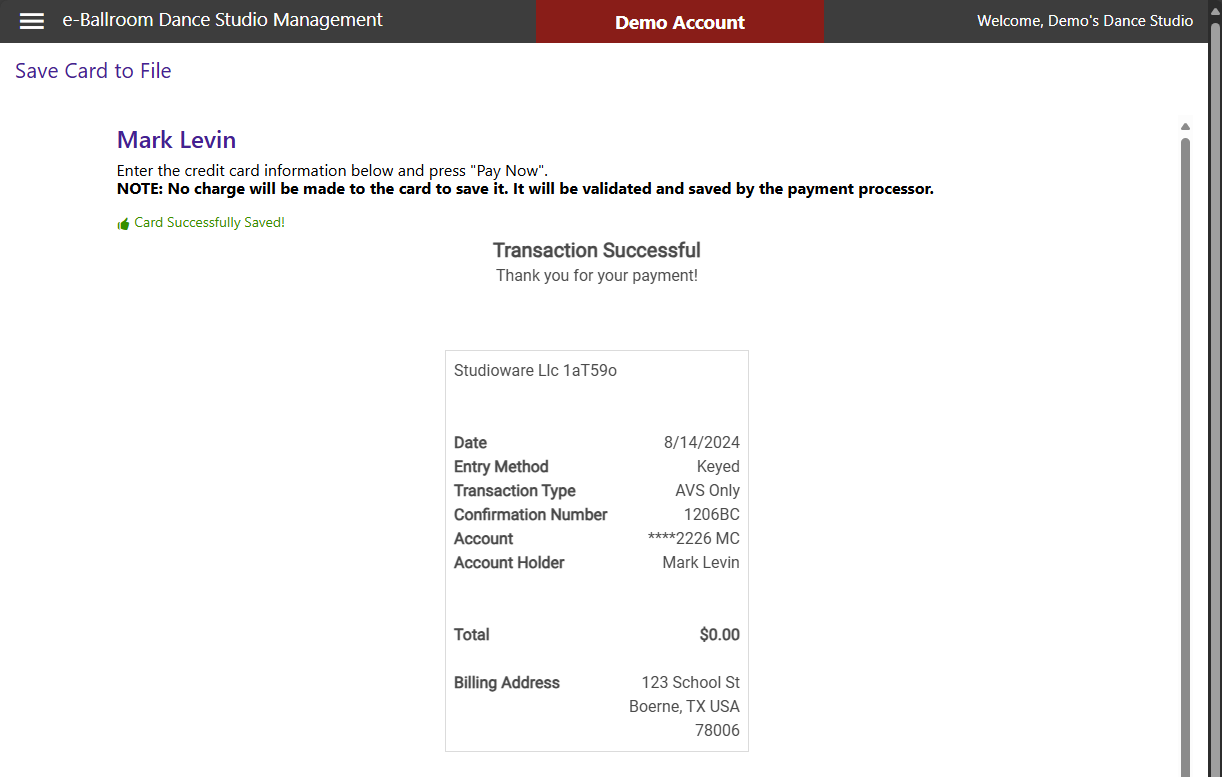
When prompted, confirm the client’s name, and enter in their payment information. Their billing address is linked to the credit card and is used to ensure billing can occur properly without the card being present.
After you have filled out all of the information, press “Pay Now”. The card will NOT be charged. This is a \$0 “AVS” (Address Verification) transaction that is used to validate and save the card to the client’s profile with the payment processor.
NOTE: e-Ballroom does not store card information. The processor stores the card information. You will be able to view and manage the saved card within your Fortis web terminal.
If the address and card verification is successful, you will see a “Card Successfully Saved” and “Transaction Successful” note.
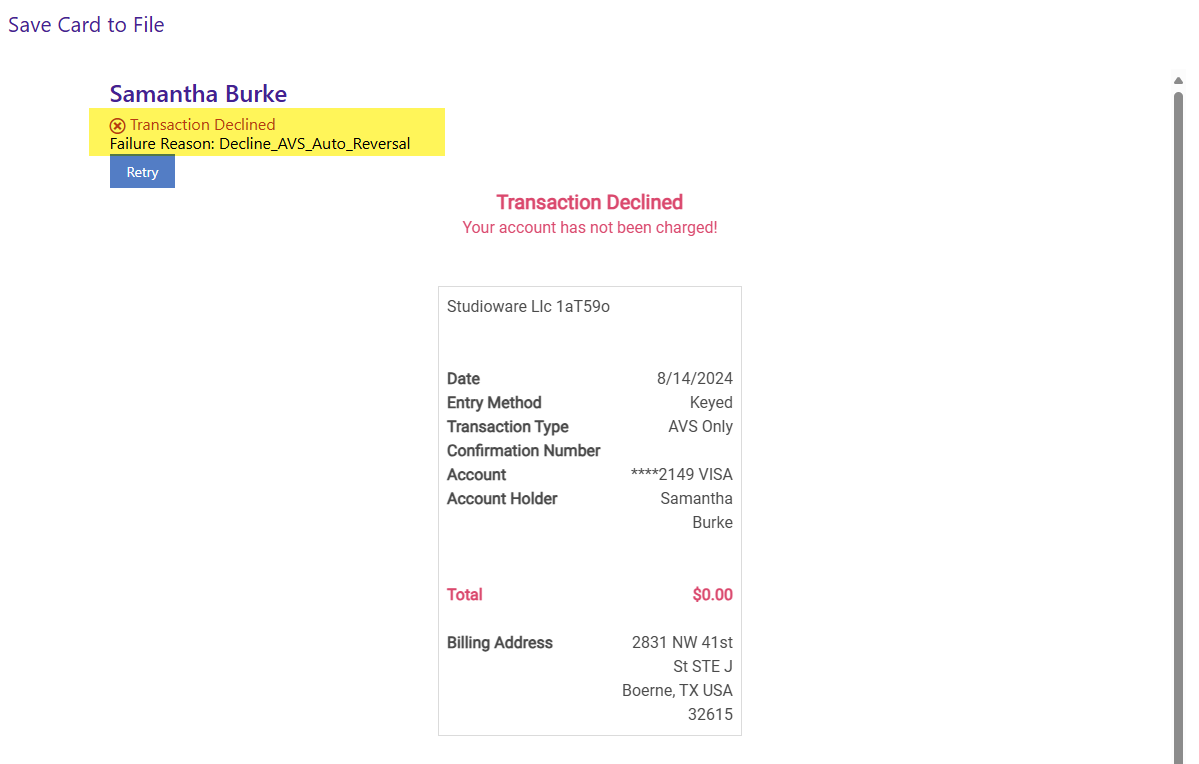
If the card and address verification fails, you will see a failure code, a “Transaction Declined” message, and a button you can press to Retry.
Taking a Credit Card Payment
Once the e-Ballroom staff has activated your integration, you will receive an email confirmation. You can begin using the integration immediately after this, either with manual card entry or with a card reader (if available).
Choosing Credit/Debit Card Payment Method
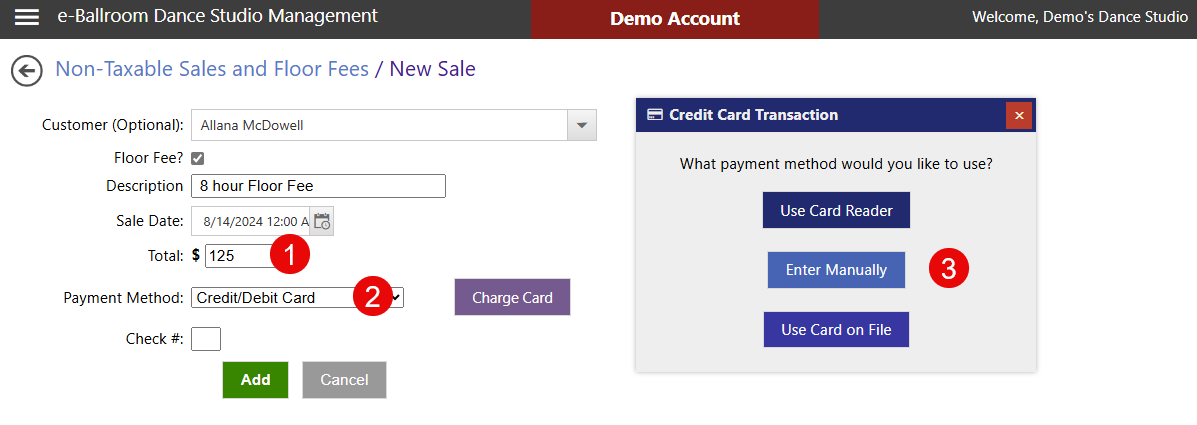
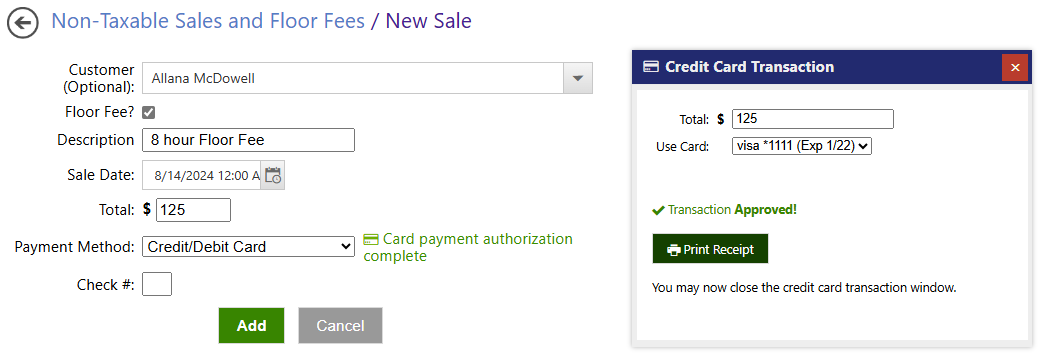
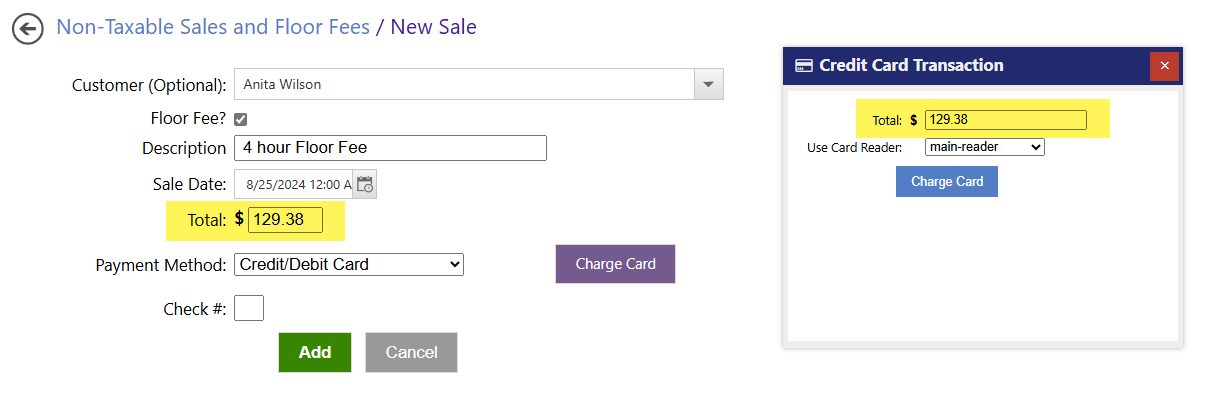
On any e-Ballroom transaction, to begin collecting a card payment, first enter the amount due, then select “Credit/Debit Card” in the payment method drop down.
For example, we will be using a Non-Taxable Sale as shown below.
Step 1 outlines entering the amount due, this is what will be charged to the card today.
Step 2 outlines selecting “Credit/Debit Card”.
Step 3 is the Credit Card Transaction Window. We’ll discuss this next.
About the Credit Card Transaction Window
When you begin to collect a payment, the “Credit Card Transaction” Window appears after selecting “Credit/Debit Card” payment method. This window is moveable, just drag it by the blue header to move it around if desired.
Note
You may need to look around your screen to locate the window. It should open near the top, but on some screens, it may appear near the bottom.
Next to the payment method drop down, there is a button titled “Charge Card”. This will re-open the Credit Card Transaction window if it is closed.
Once you have located the window, select which payment method you want to use.
Using a Credit Card Reader
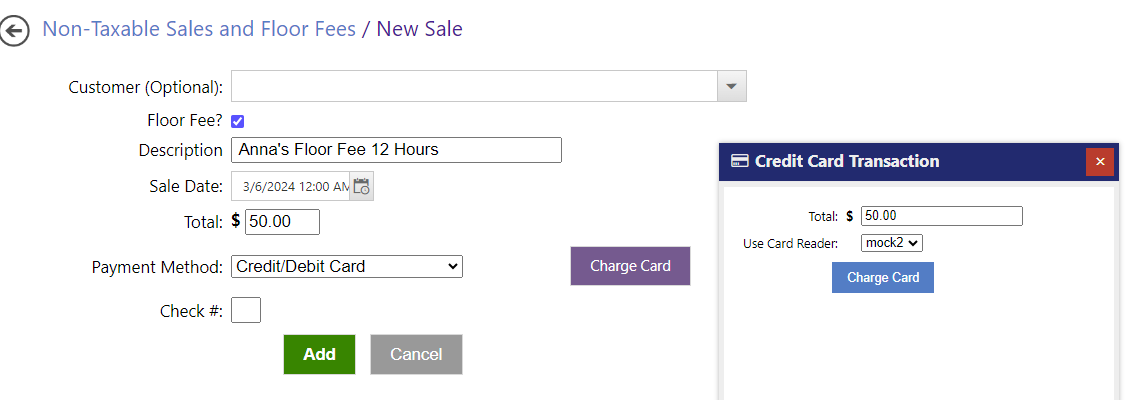
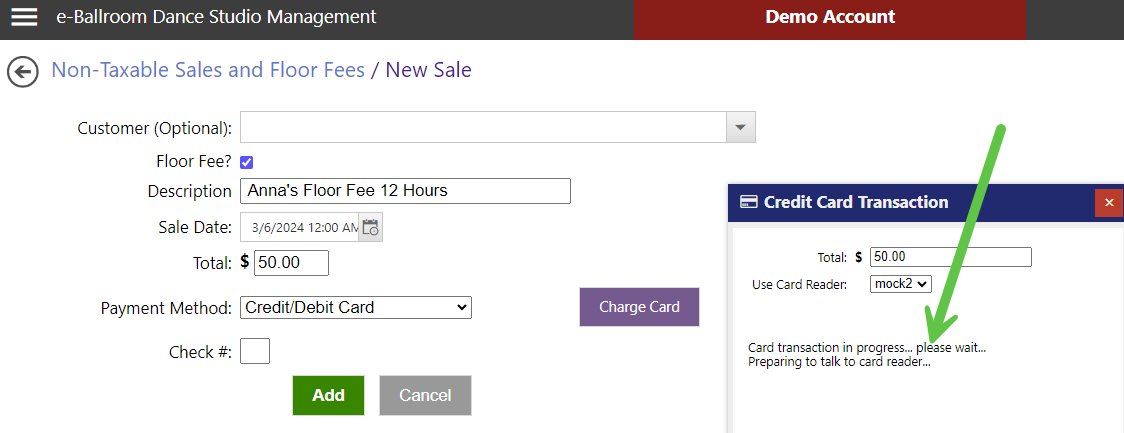
When you select “Use Card Reader”, confirm the transaction amount, and select which of your reader(s) you want to use. Then press “Charge Card”.
You will notice a series of status updates as shown by the green arrow was we talk to the card reader, the reader communicates with the processor and card issuer, and the transaction completes.
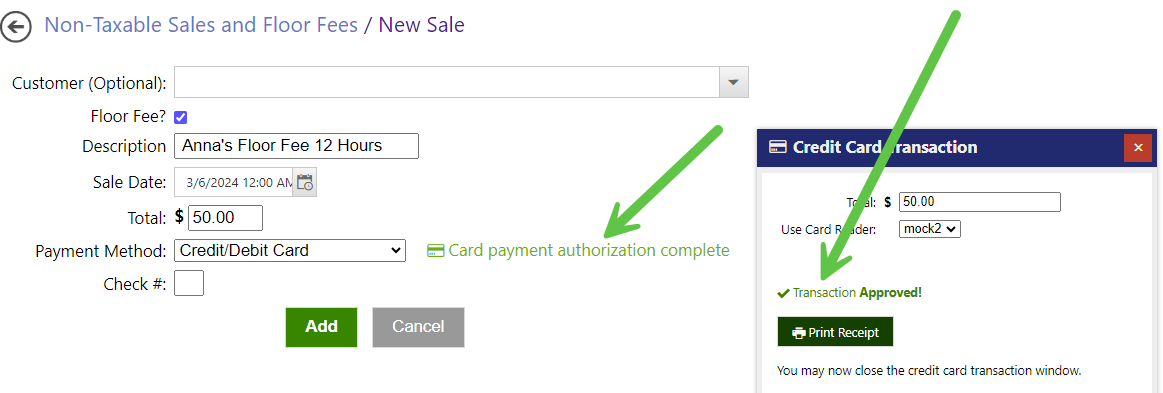
If the transaction is approved, you will see the below updates. You can then proceed with
Note
Email receipt functionality is coming soon (Spring 2024). You can also issue an email receipt from your Fortis “Zeamster” gateway.
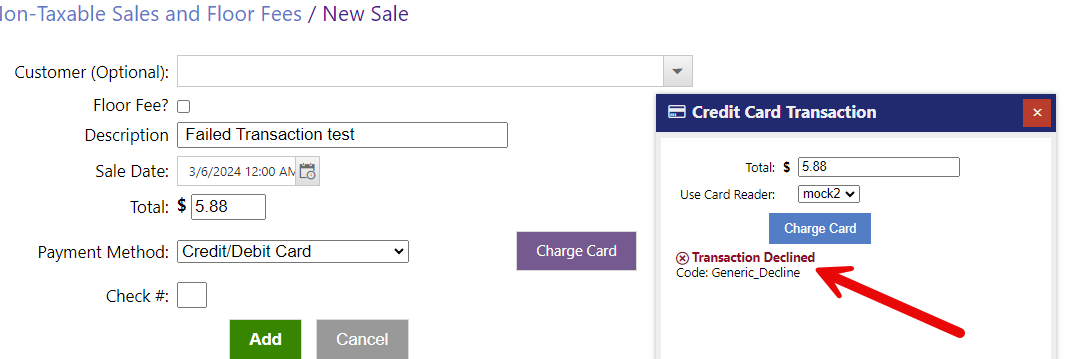
If it fails, you will see a failure notice and the option to try again.
Entering Payments Manually
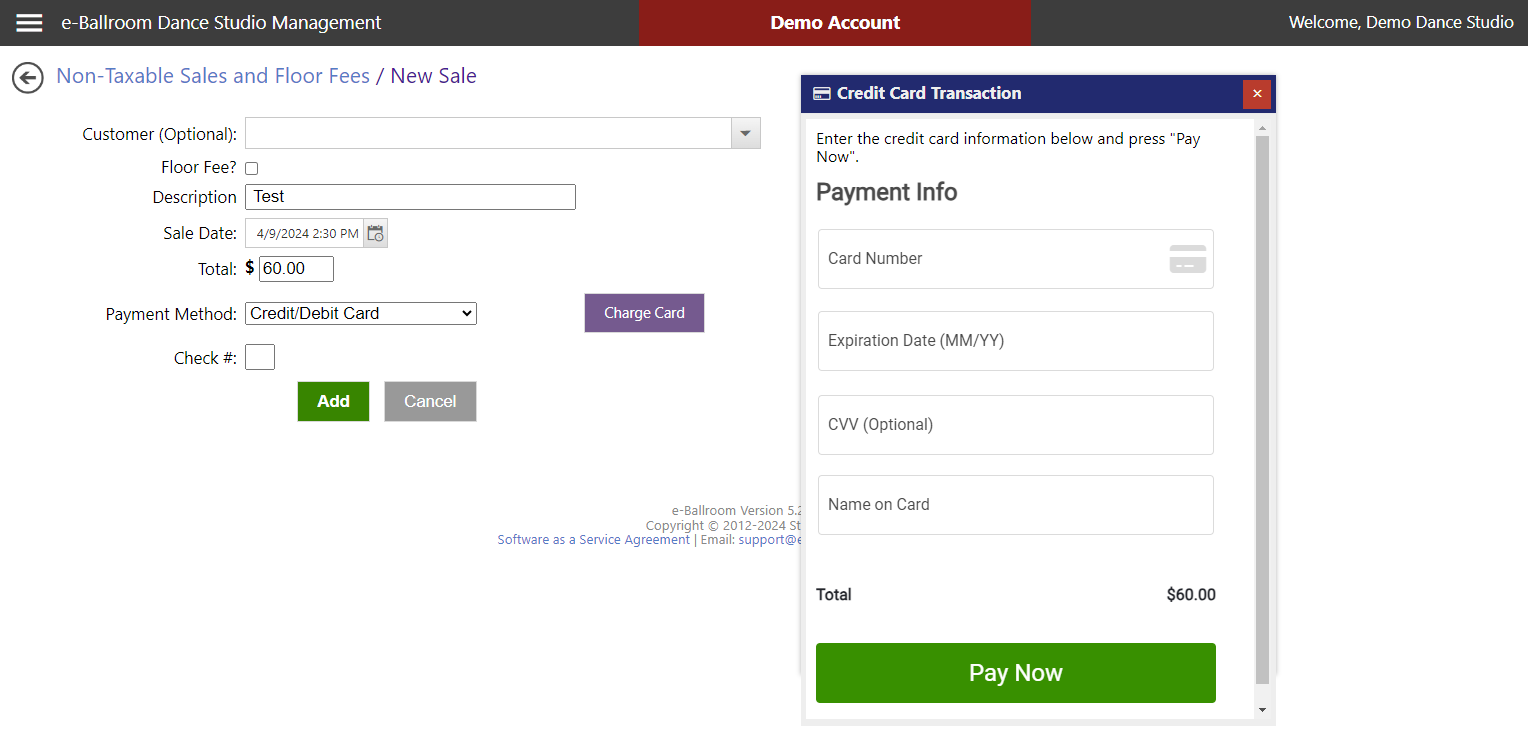
To enter a payment manually, select “Enter Manually” in the Credit Card Transaction Window. The below form will appear.
Enter the card information as shown, then press “Pay Now”.
When the Transaction Successful notice is shown as identified by the green arrows in the image below, you can close the “Credit Card Transaction” window and save your record in e-Ballroom.
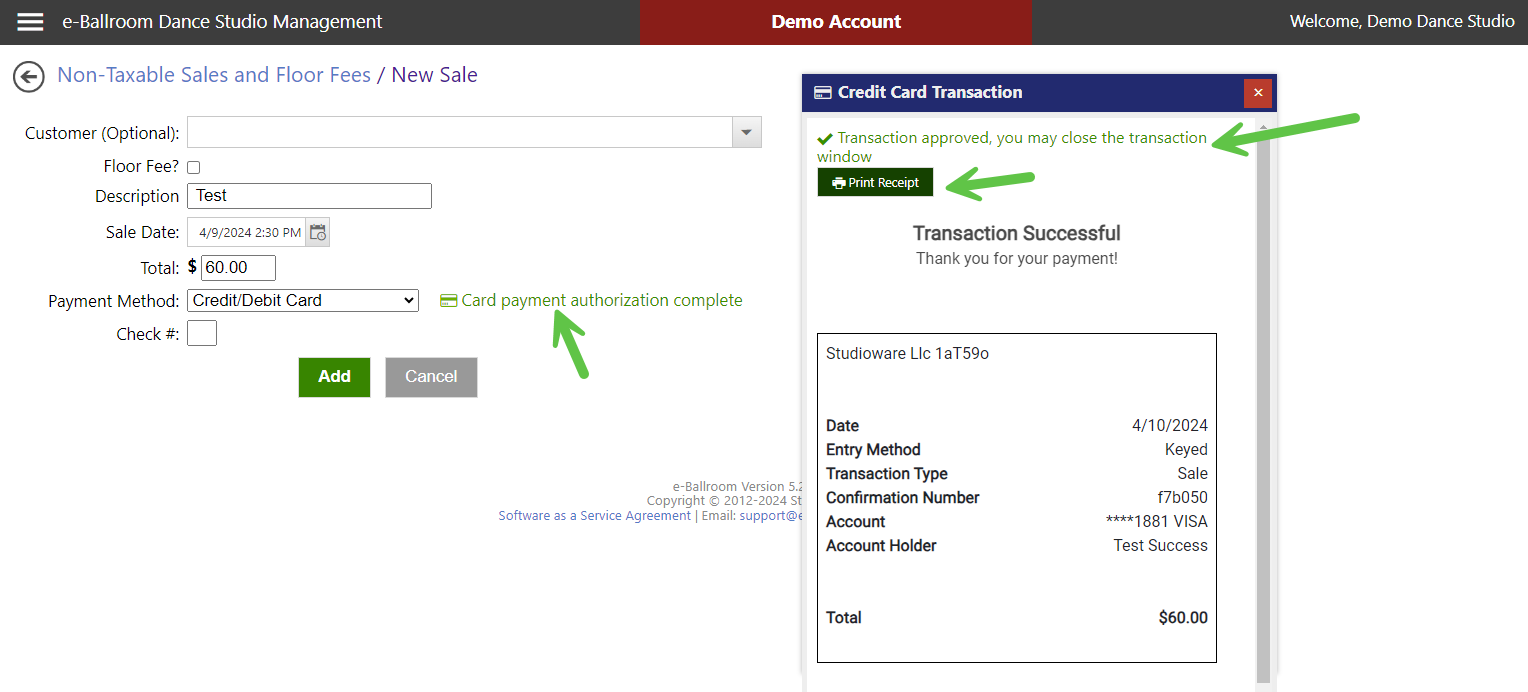
If the payment fails, you will see the “Transaction Declined” message and the failure reason.
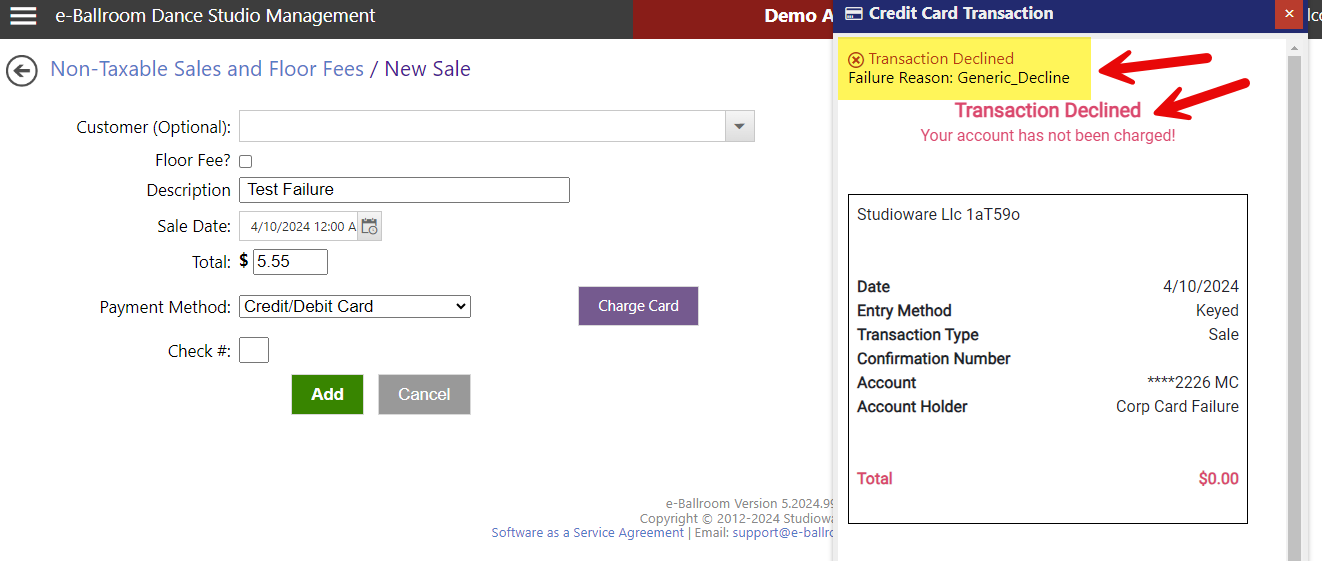
To attempt to charge the card again manually, do the following steps:
- Close the “Credit Card Transaction” window.
- Change the payment method to “Cash”
- Change the payment method back to “Credit/Debit Card”
- Begin the process to charge the card manually
Note: This process will be enhanced for an easier experience in April/May 2024.
Charge a Card on File
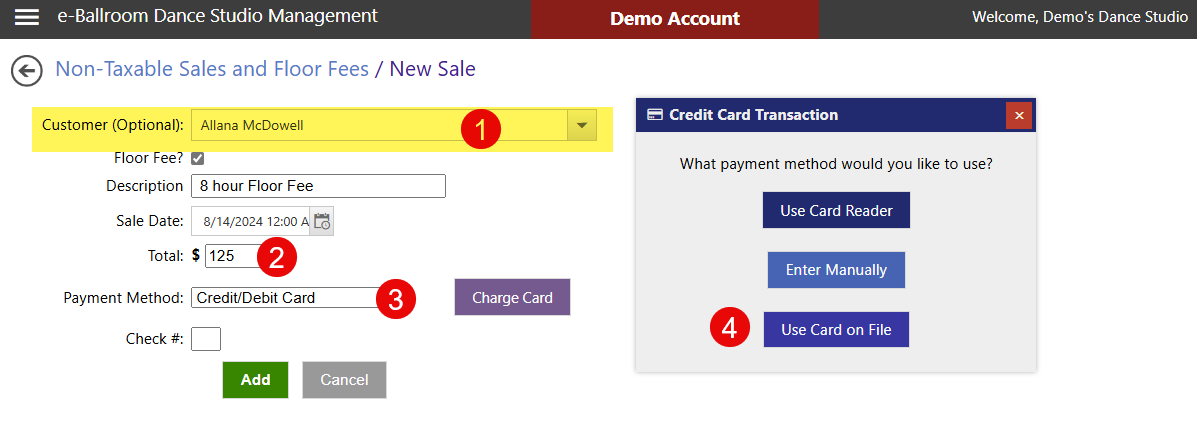
First, if a client has saved their card to a file, select the Customer name if there is a customer name field (e.g. sales, new contract/packages, etc). Enter the amount due, change the payment method to “Credit/Debit Card”, then when presented with the Credit Card Transaction window, select “Use Card on File”.
Next, validate the total charge and confirm which card you want to use, if there are more than one listed. Press “Charge Card” when ready.
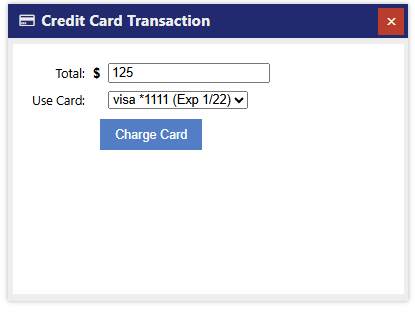
If the transaction is approved, you will see an approval notice similar to the one below:
Recurring Payments
Automatic recurring payments are now supported for Monthly Memberships and Contract/Packages on a payment plan. The initial payment will be performed using the card reader or entered manually. Subsequent automatic payments, e.g. the Membership payment due next month or the contract/package payment due in 2 weeks, will be handled automatically by the payment processor. e-Ballroom will log and update successful recurring payments.
Recurring payments can always be managed by your Zeamster/Fortis terminal too.
Memberships
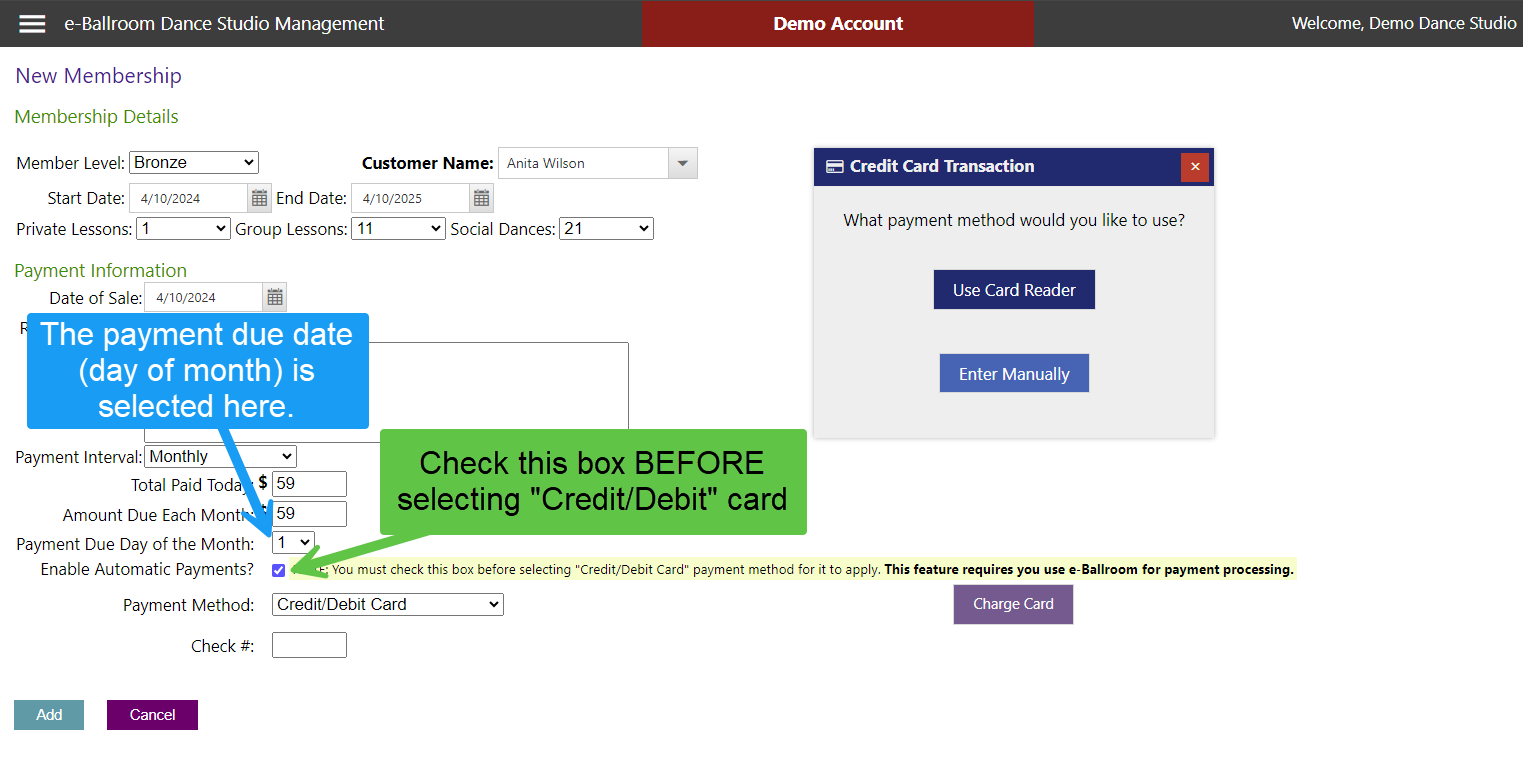
When creating a monthly membership with automatic payments, you must select the Payment Due Day of the Month. A value of 1, for example, will be for the first day of the month. The first automatic payment will be next month on the 1st.
Tip
IMPORTANT! Ensure you select “Enable Automatic Payments” BEFORE you change the payment method to “Credit/Debit” Card as shown below.
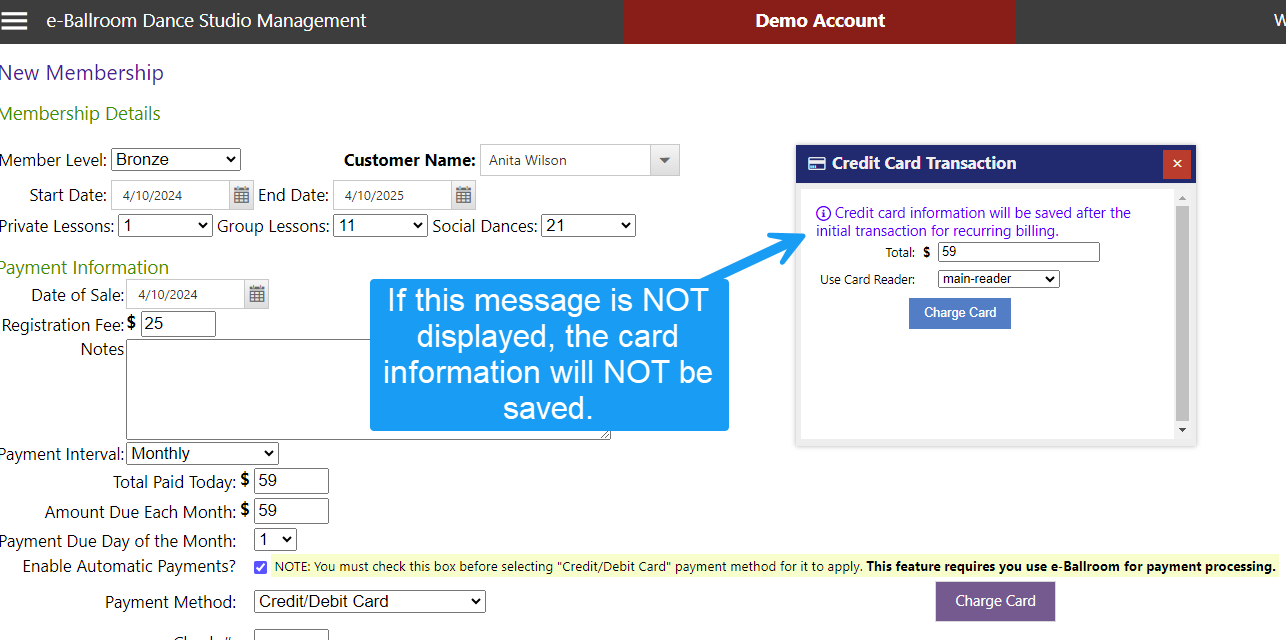
If automatic payments will be created, the transaction window will annotate this.
Proceed with completing today’s transaction and saving the record within e-Ballroom.
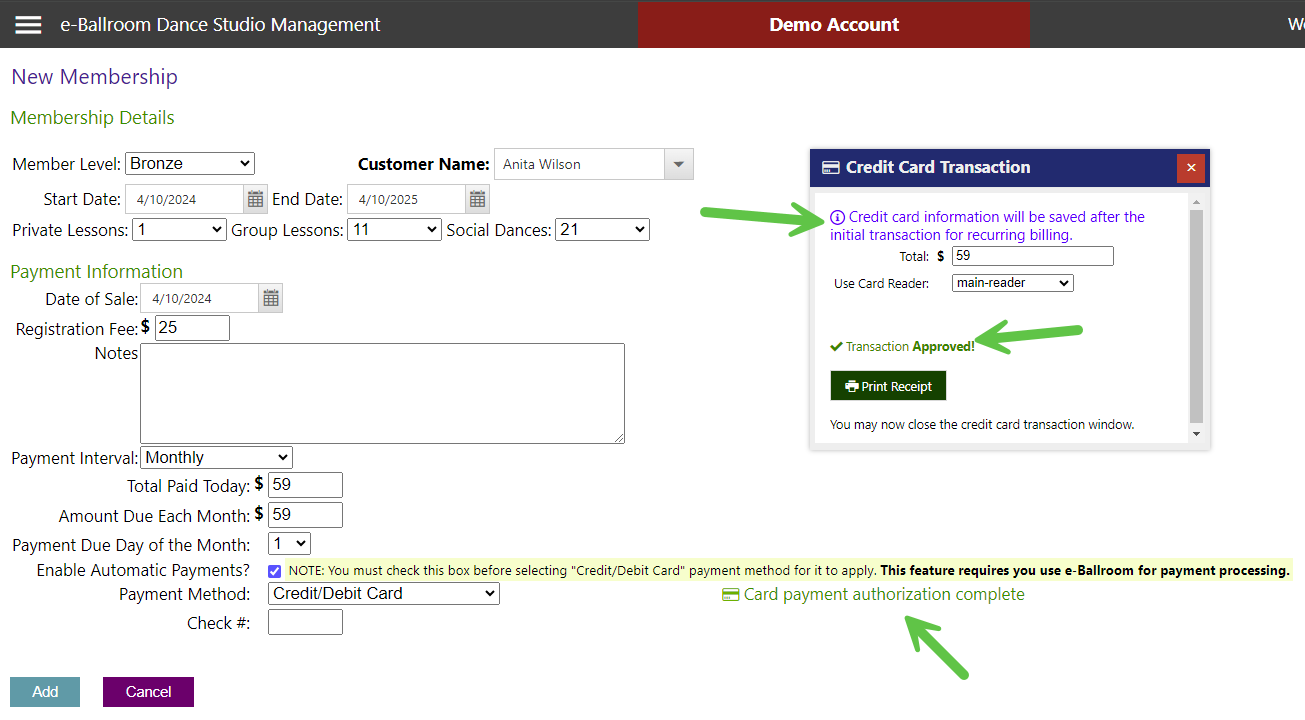
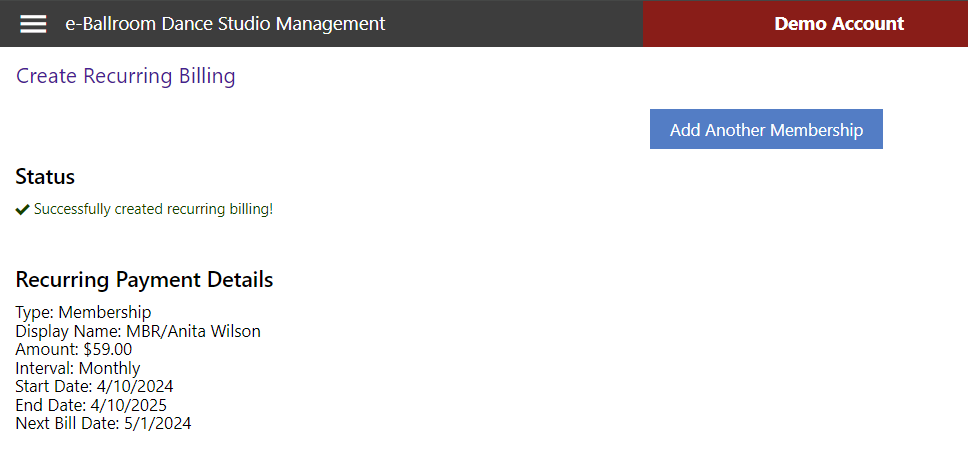
After you have completed the membership creation, the recurring payments will be established. This confirmation screen will appear:
Contract/Packages
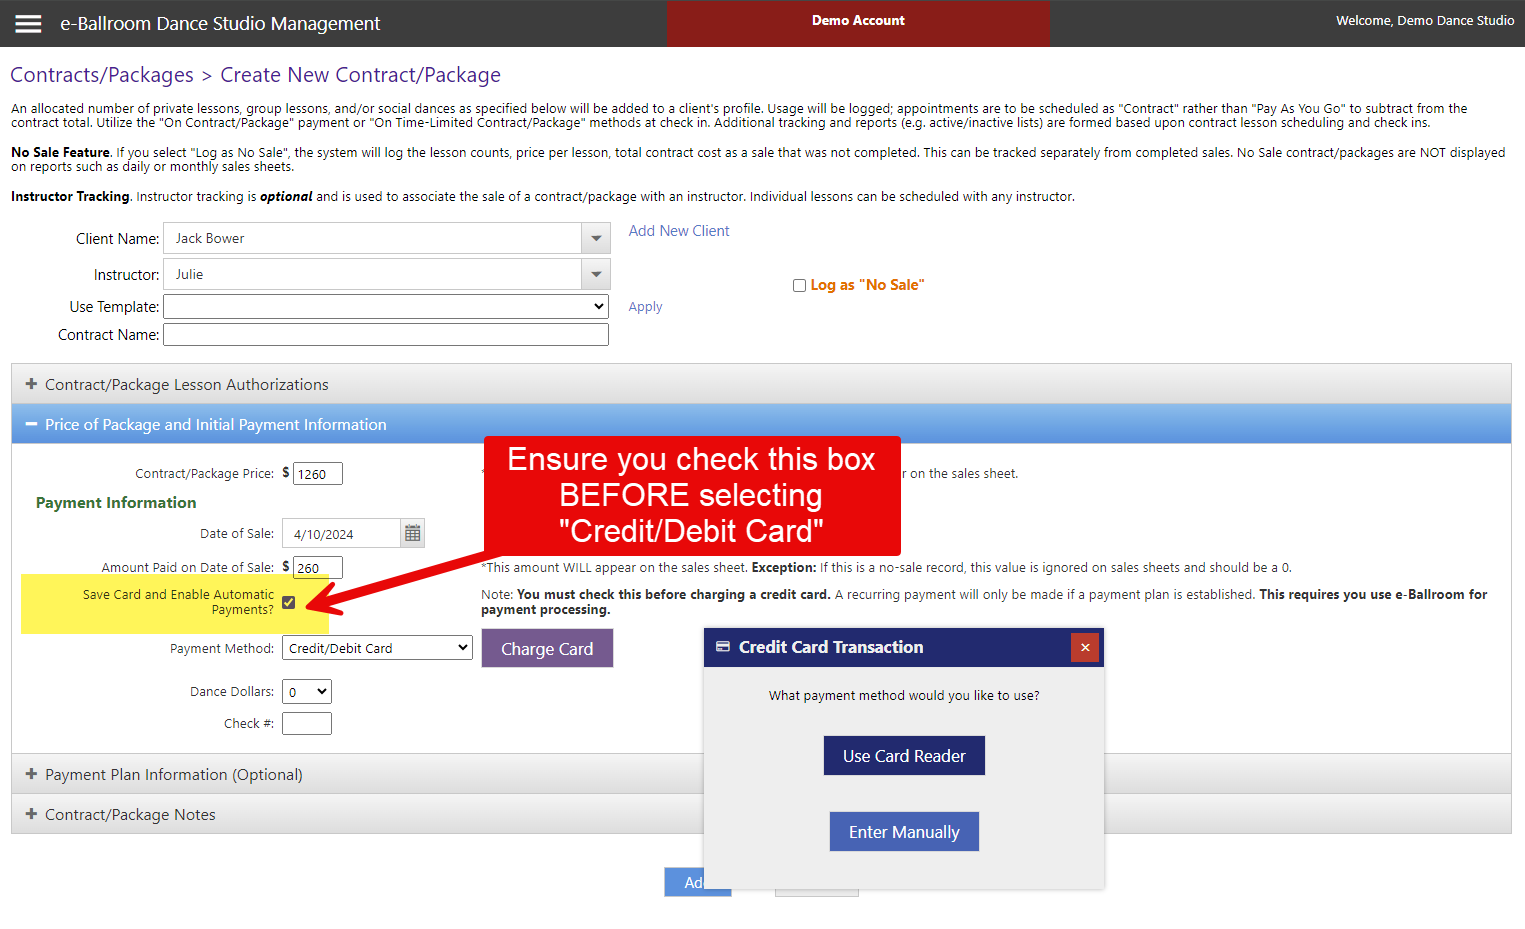
To create a contract/package with a recurring billing, there must be a new contract created with a payment plan. Complete the contract as normal, and ensure you check the box for “Save Card and Enable Automatic Payments” as shown below.
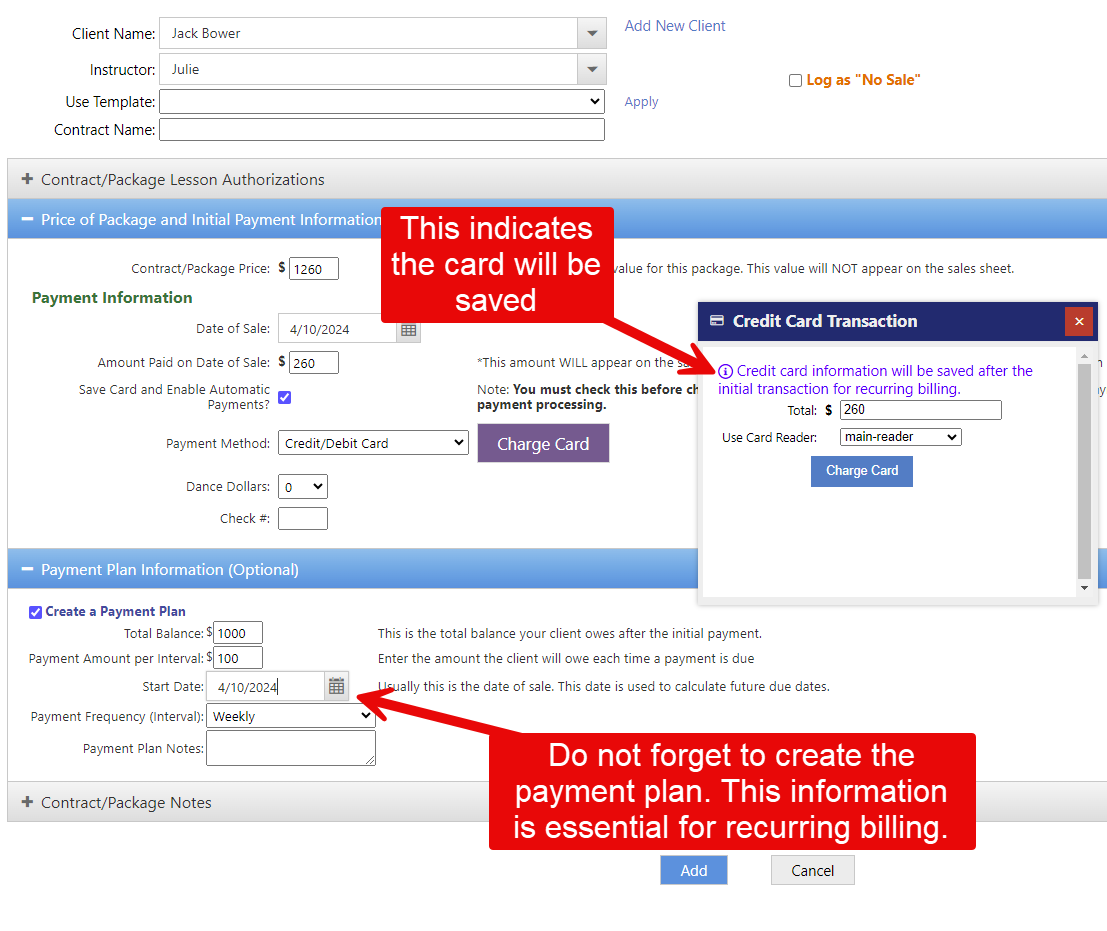
You will see a notice that the card will be saved as shown in the image below. Ensure you complete the payment plan details as those are used to create the recurring billing. After today’s transaction is approved, save the contract/package. You will be redirected to a new screen that will create the recurring billing.
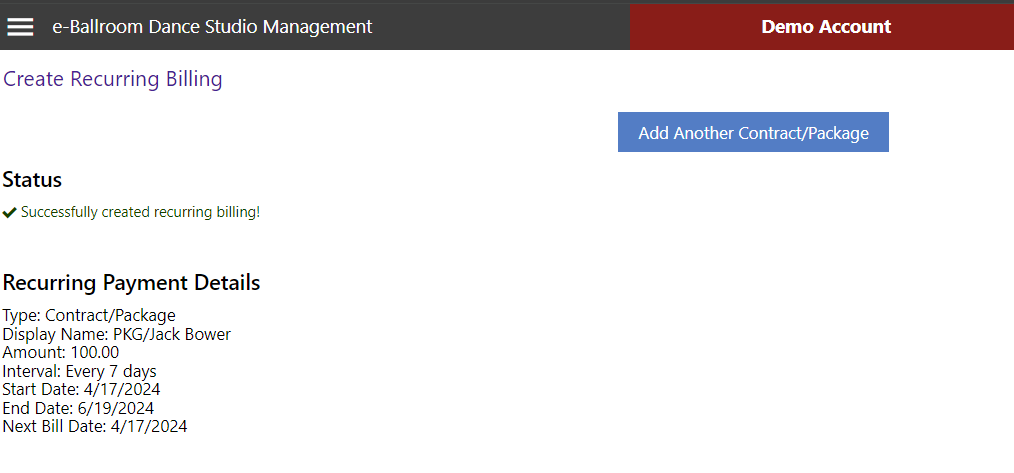
If the recurring billing is created successfully, you will see a notice similar to below:
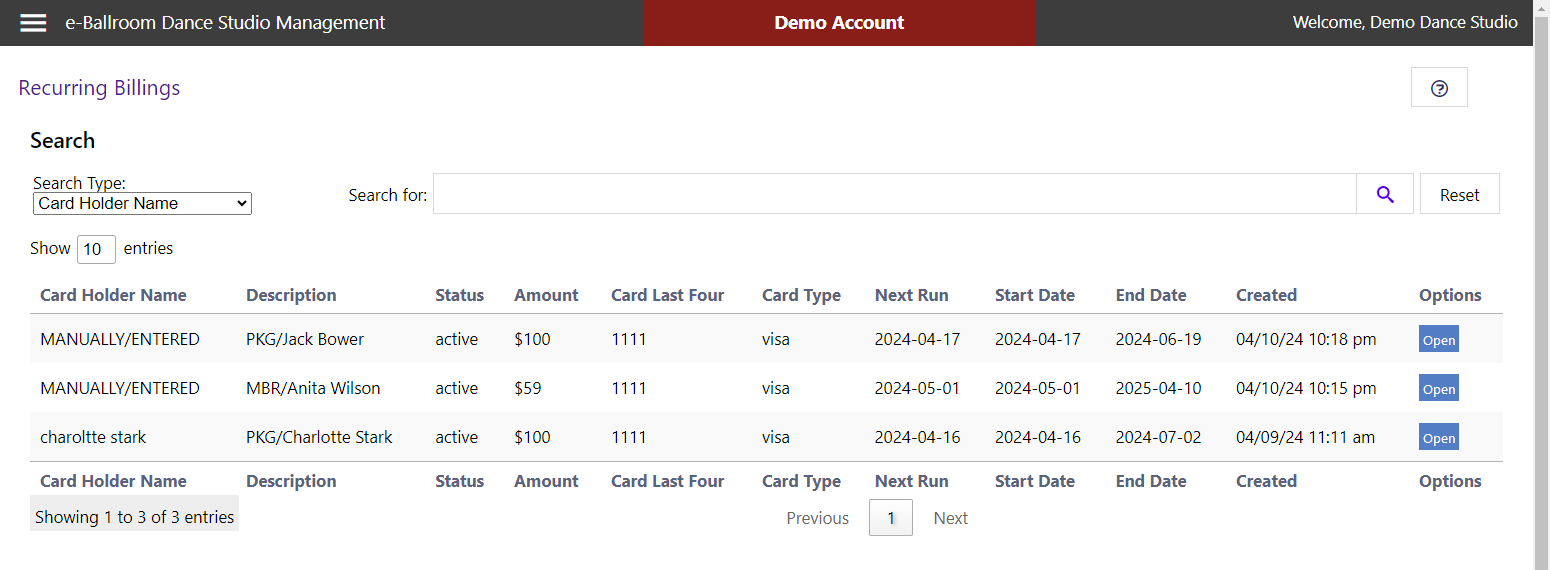
Reviewing Existing Recurring Payments
To review existing recurring payment schedules, navigate to Payment Processing > Recurring Billings. In the below example, Contract/Packages are prefixed with “PKG/”. Membership payments are prefixed with “MBR/” in the description field. The name that follows is the e-Ballroom name. The card holder name is what is on the card used to create the payment plan. These may or may not match (e.g. a contract for a child or a spouse/partner paid with a card of a different name).
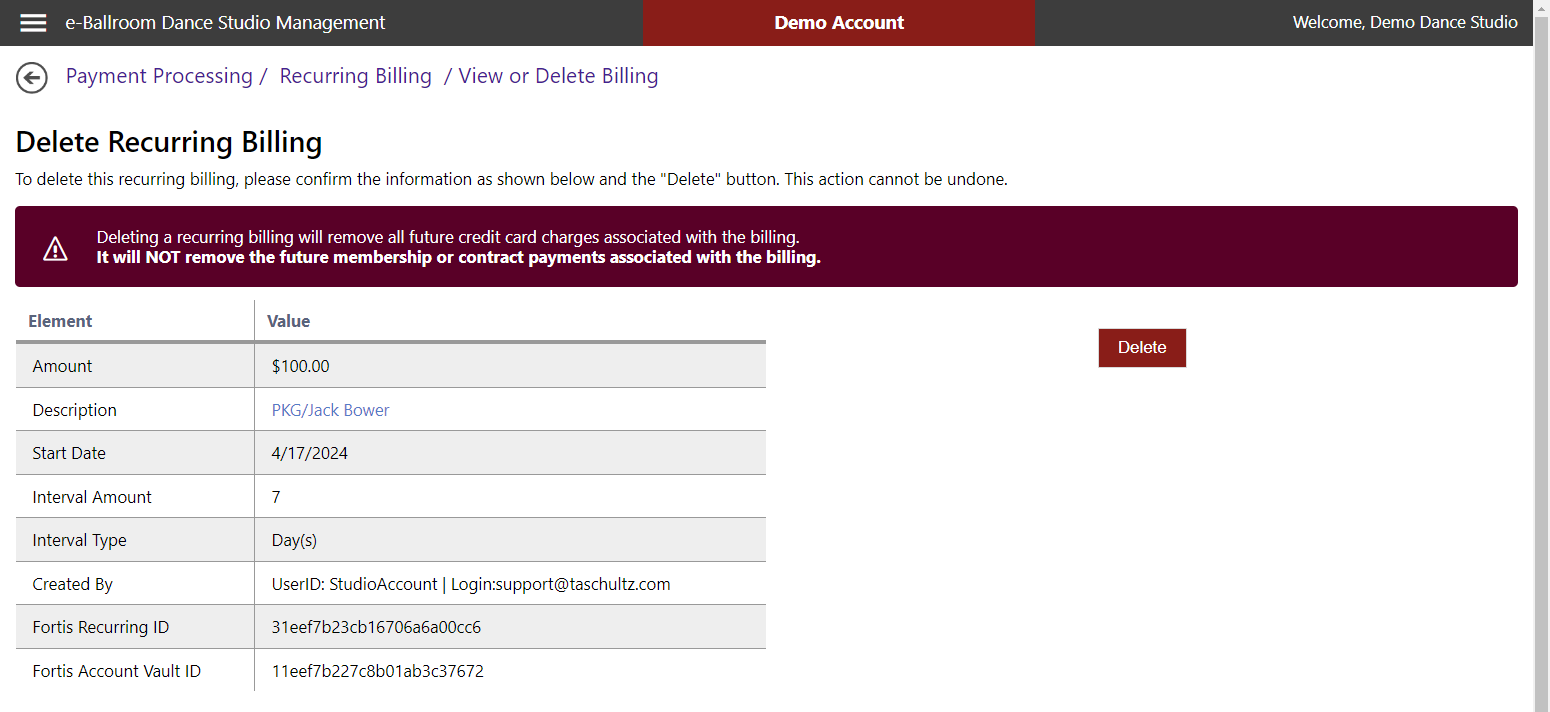
Viewing or Cancelling Recurring Payments
You can review information about a recurring payment by pressing “Open” from the Recurring Payments screen. You will see details about the recurring billing on the new screen. Press “Delete” to stop all future payments. Adjustments to payments, such as edits to billing dates or amounts, can be accomplished in your Fortis/Zeamster portal.
Warning
Deletions of a recurring payment do NOT delete the corresponding membership or contract/package. It will also NOT delete the e-Ballroom expected payment records. This is by design.
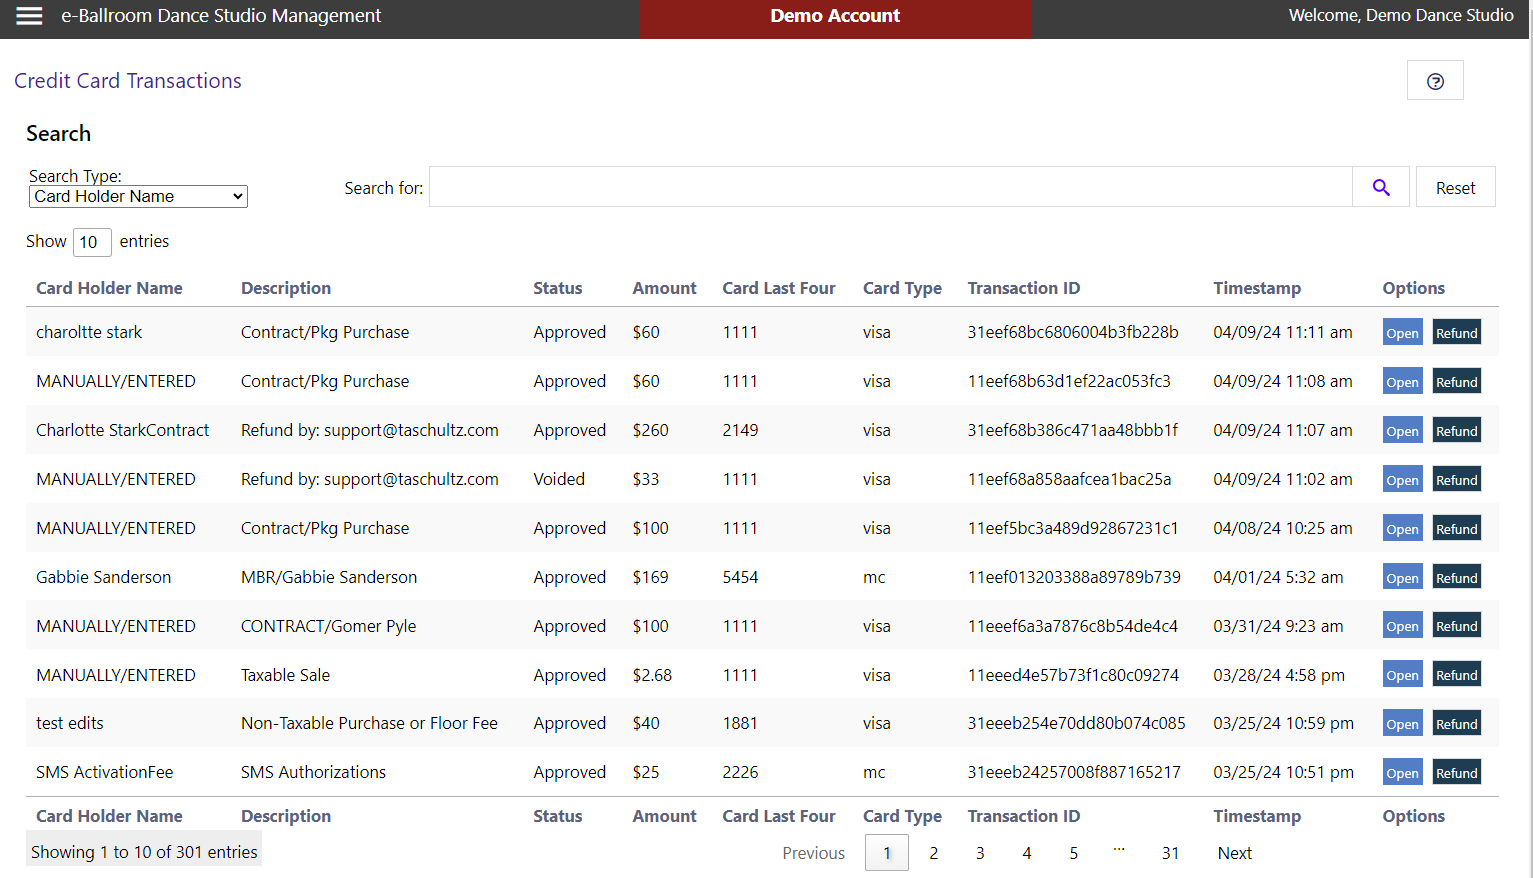
Reviewing Transactions
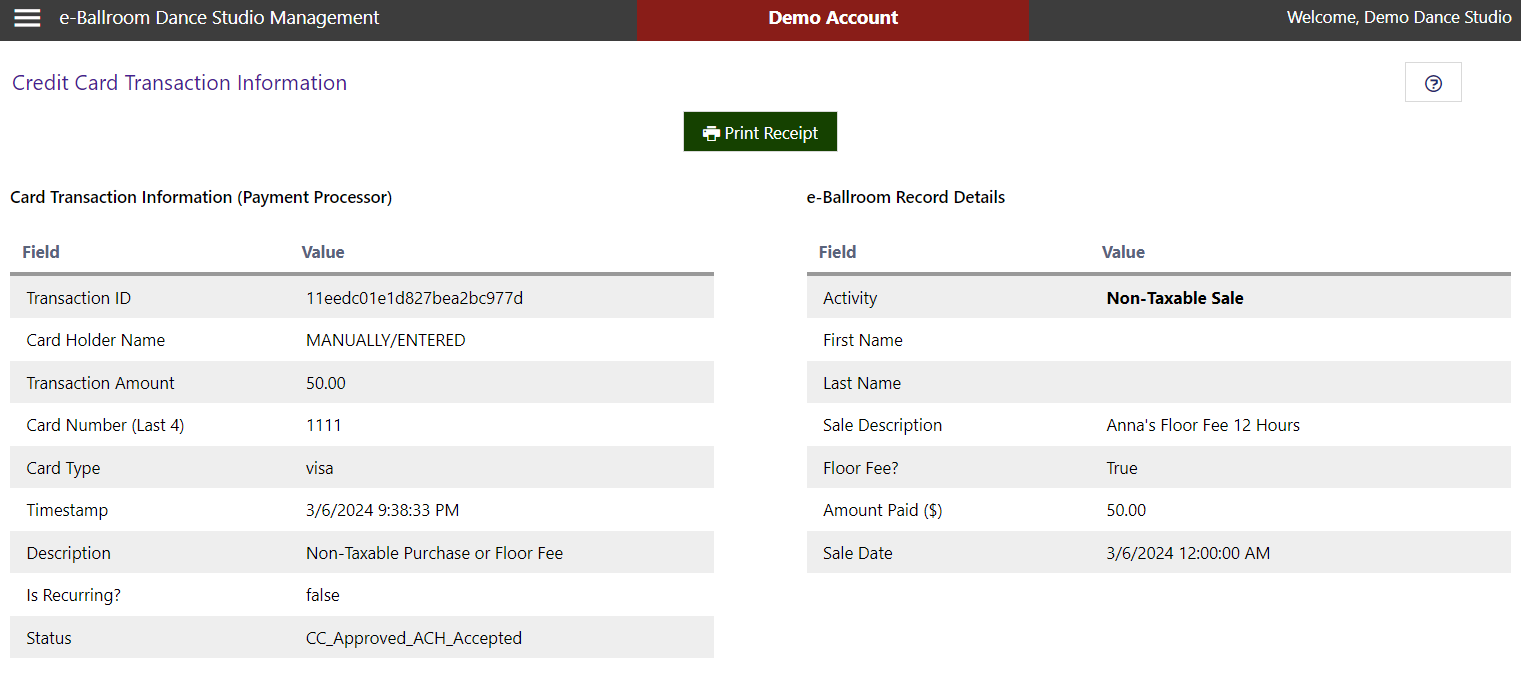
To review transactions, go to Payment Processing > Review Transactions. You will see the current transactions in the grid. Pressing the “Open” button will open a new window where you can see additional details about the transaction and re-print a receipt.
Transaction searching can be done based on:
- Card Holder Name
- Description
- Card Last Four
- Fortis Transaction ID
- e-Ballroom Transaction ID
Enter the search term and select the search type, then press the “Hourglass” icon. Press “Reset” to clear your search.
Transaction Details Screen
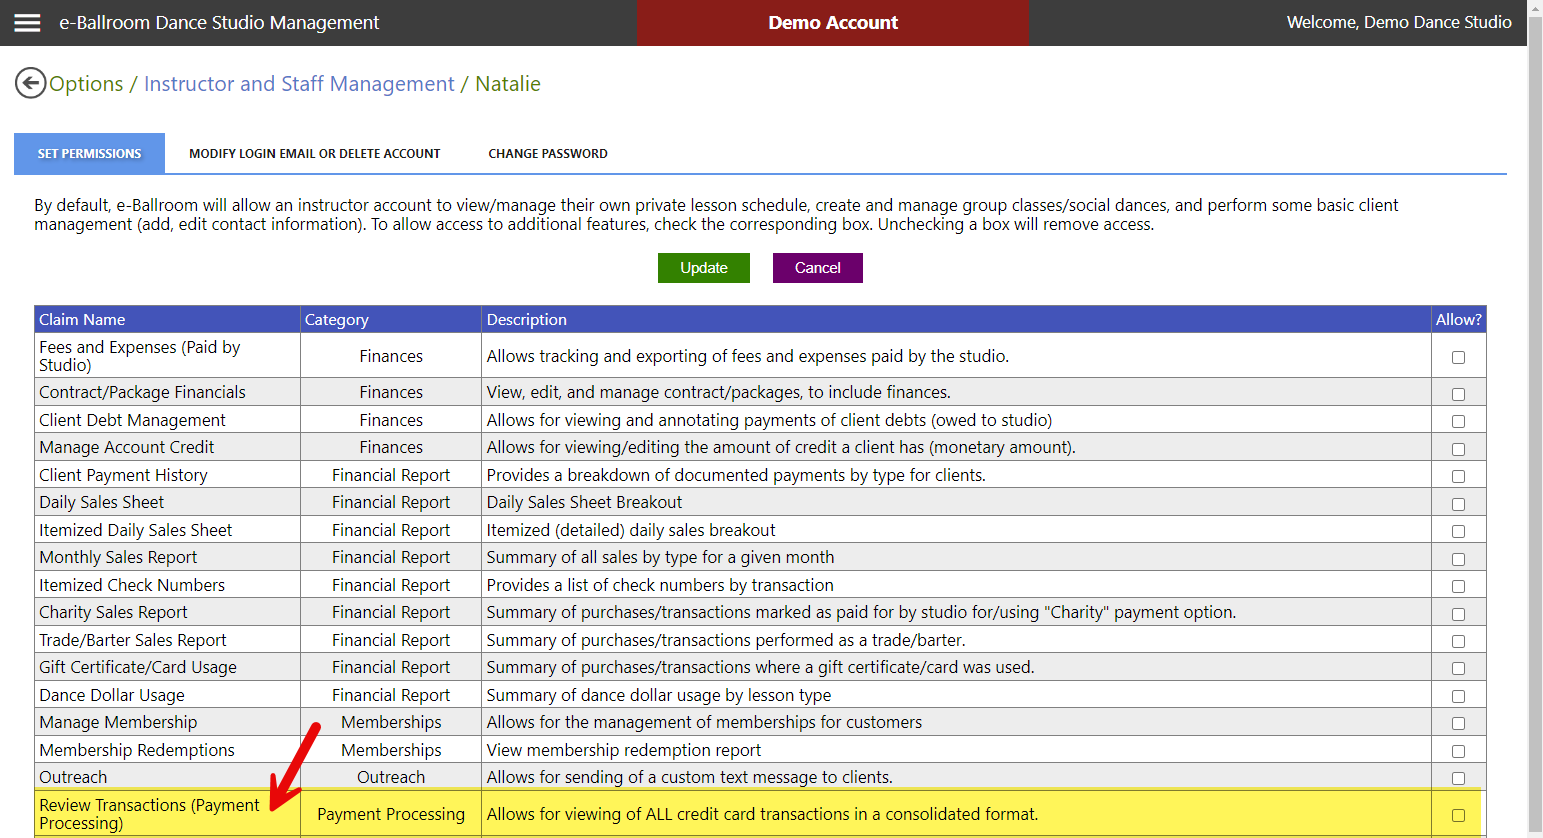
Review Transactions Permissions
Reviewing transactions is only authorized for the Studio account by default. Instructor and staff accounts must be granted the permission to review transactions. The claim required is “Review Transactions (Payment Processing)”.
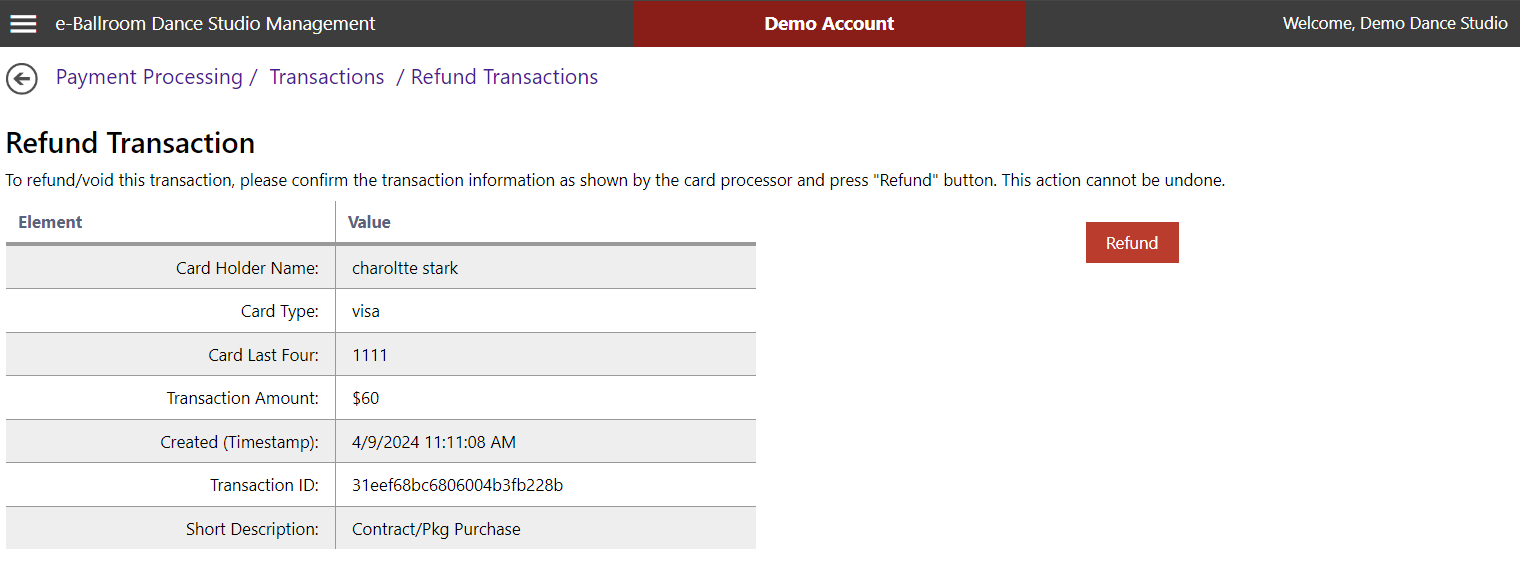
Refunding Transactions
First locate the transaction to refund using the “Review Transactions” screen. Press “Refund” when ready. When you are ready, press “Refund”.
Refunds are for transactions that have settled. Voids are for transactions that have not settled (e.g. same day charge). This page will handle both functions appropriately.
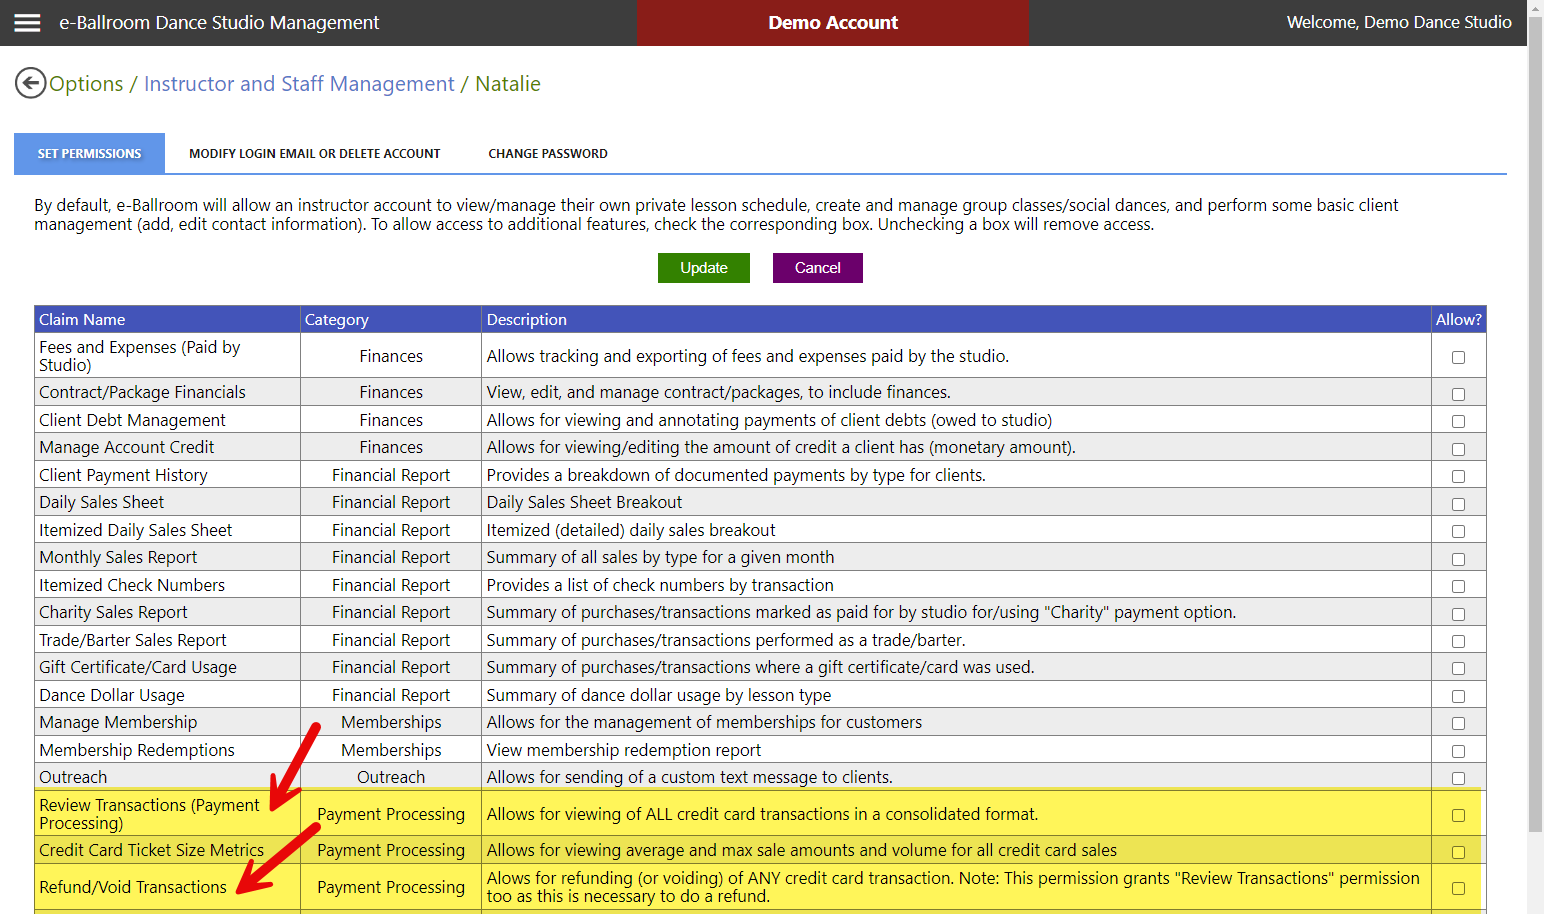
Refund Permissions
Refunding transactions is only authorized for the Studio account by default. Instructor and staff accounts must be granted the permission to perform refunds. The claim required is “Refund/Void Transactions”.
Cash Discounts
Cash Discounts on prices are an optional feature for e-Ballroom subscribers that use integrated payments. This allows the subscriber to implement “gas station pricing models”, where cash (or check) purchases are at a discounted rate compared to credit/debit card transactions.
Enabling Cash Discounts
Navigate to Settings > Program Options and Settings. Click on the “Default Prices and Settings”. Select “Yes” for “Do you charge a different price for cash versus card transactions?”

Set the Cash Discount rate. This can be a percentage of a transaction, e.g. 3%, or a flat fee, e.g. \$3.00. Update your cash pricing defaults, if necessary.
The cash discount rate is added in to card transactions by e-Ballroom. It is removed from card transactions when the payment method is changed back to cash.
You will always be able to confirm the card transaction amount before a card is charged!
Using the Cash Discount
On the “Total” / “Amount Paid Today” box, enter, or confirm, the base price (including the cash discount) BEFORE adjusting the payment method.
Upon selecting “Credit/Debit Card”, observe and confirm the removal of the cash discount (e.g. adds in the amount of the discounted value).
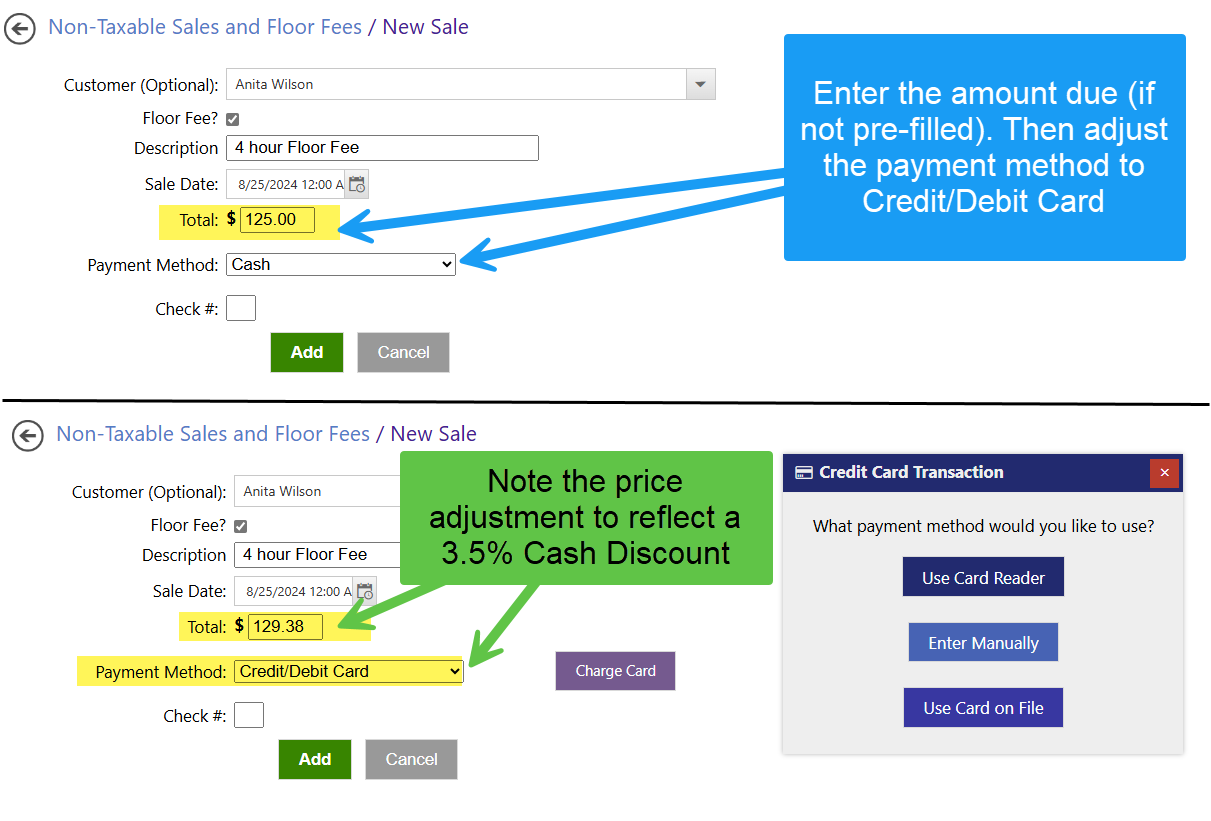
Proceed with the credit card transaction, confirming the total due and complete the transaction.
Warning
Flipping the payment method back to a cash/check payment method will revert the total/amount paid field back to the originally entered value.