Initial Configuration
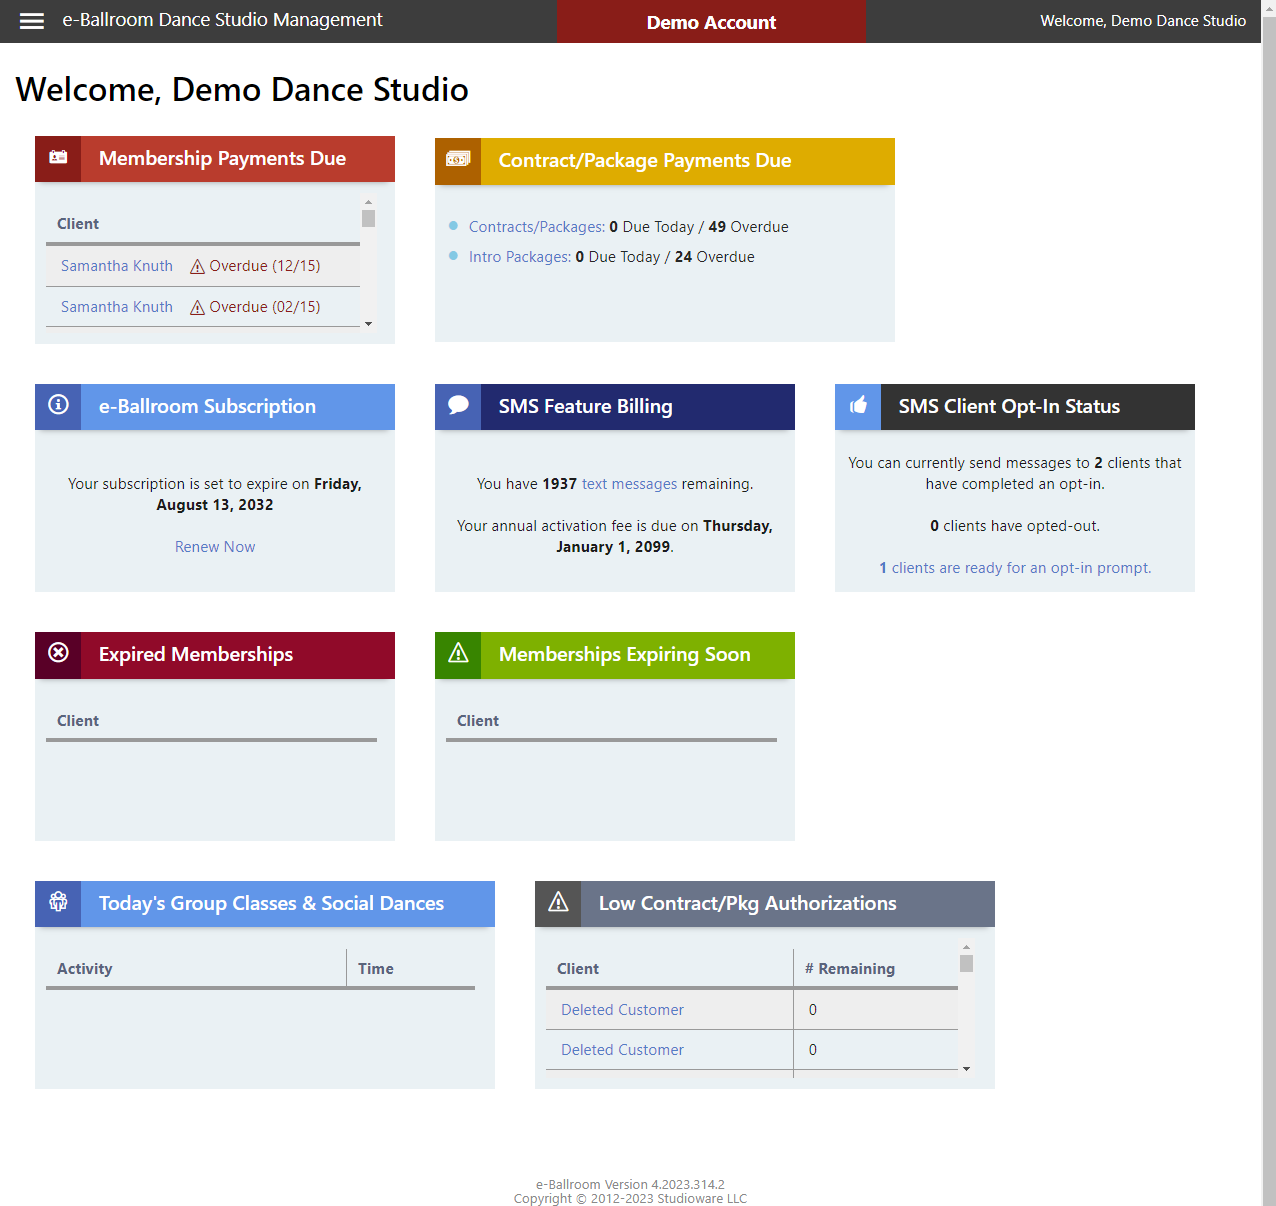
Welcome Page
When you login for the first time, there is only one instructor, “Instructor #1”. By default, you are taken to the welcome page. Here, you’ll see an overview of various elements of information.
Step 1: Configuring your Instructors
The first thing you will want to do is to setup your instructors. You can do this by clicking on the “Hamburger” navigation menu at the top left. Go to Settings > Manage Instructors.
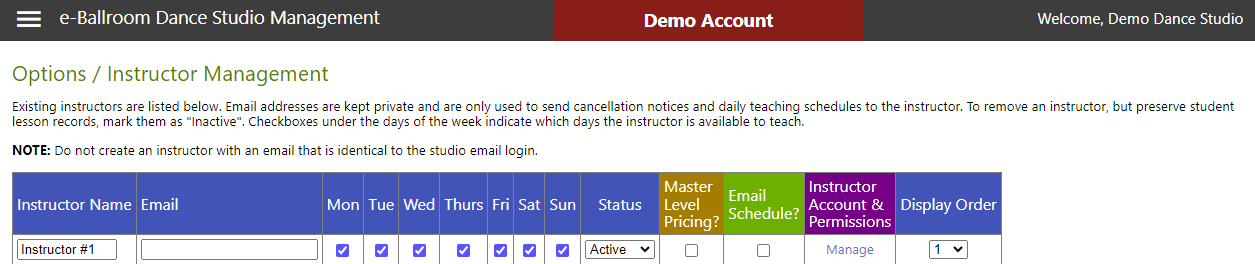
As you can see above, one instructor already exists. Simply provide the email (if desired) and change the name “Instructor #1” to the instructor’s name. Press “Update” when complete.
If an instructor is to default to “Master Level” Pricing, check the corresponding box. If the instructor wishes to have their private lesson schedule emailed to them daily, check “Email Schedule”. Display Order will allow you to arrange instructors in a customizable order on the private lesson schedule interface columns. Ensure you hit “Update” when done!
Adding a New Instructor
To add a new instructor, enter their name, email if desired, and check which days of the week they are available to teach, as shown below.
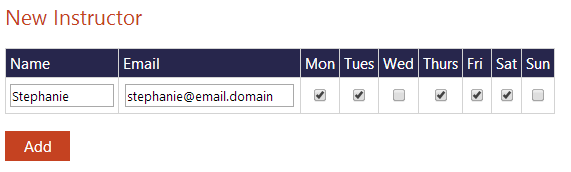
Press “Add” when complete. They will now appear in your instructor list and on your private lesson scheduler.
Removing an Instructor
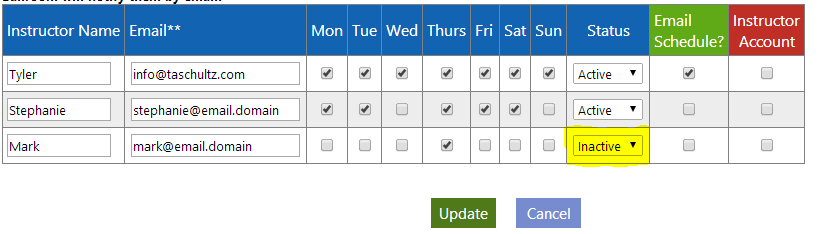
To remove an instructor from your private lesson scheduler, change their status to “Inactive” in the status column and press “Update”. An example is shown below.
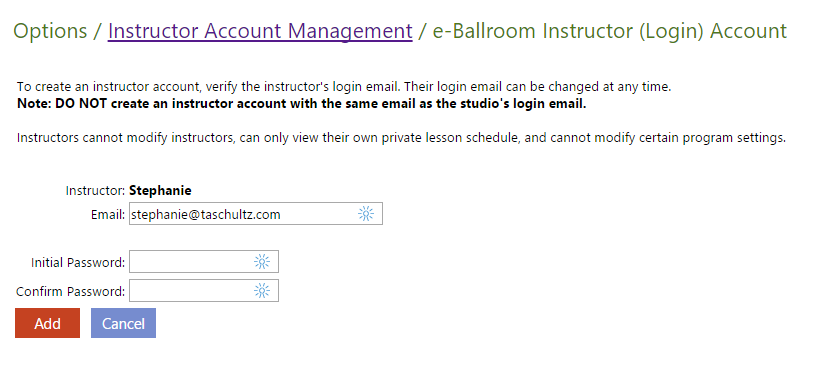
Setting up an Instructor Account
To grant an instructor access to e-Ballroom utilizing their email address (limited to their own personal view, cannot modify application settings), click “Manage”.
To create an instructor account, set an initial password and confirm their email. Once their account is activated, they will receive an email with their login credentials and require them to login and change their password.
Modifying an Instructor Account (Change Email, Password, Delete Account, Instructor Permissions)
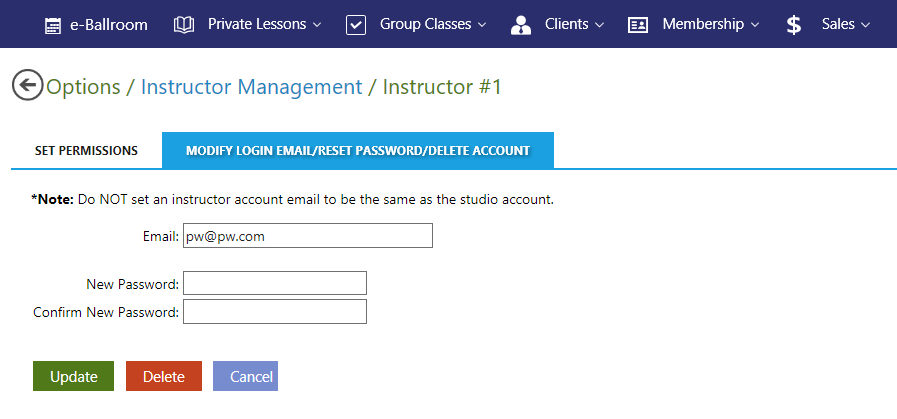
To modify an instructor’s account, such as change their email address, reset their password, or remove their account’s ability to access e-Ballroom, follow the same steps as before by pressing “Manage” in the master instructor data grid as shown on in the previous section. The following form will appear.
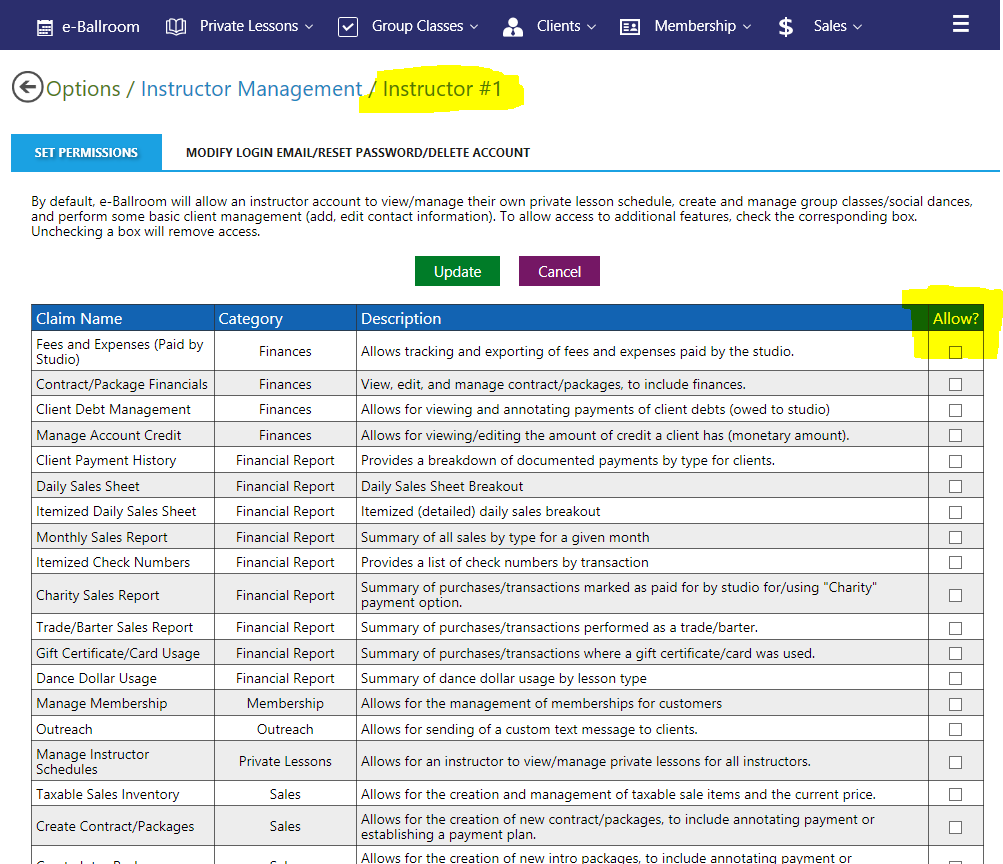
The “Set Permissions” tab allows you to grant an instructor account access to specific pages. To grant access, click the check box in the “Allow?” column for the item you wish to grant them access to. Be sure to press “Update”. Changes take effect upon the instructor logging in. (In other words, if they are currently logged in, they must log out and then back in for the changes to take effect.)
To change the instructor’s email or password, click “Modify Login Email/Reset Password/Delete Account” tab. Make the necessary adjustments and press “Update”. To delete their login account, click “Delete”.
Note, deleting the instructor account simply removes their ability to login to e-Ballroom. It does NOT delete any schedule information or data related to sales.
Step 2: Configuring Settings and Defaults
Next, you will want to setup defaults and provide studio information if it not already available. To do this, go to Settings and press “Program Options & Settings”.
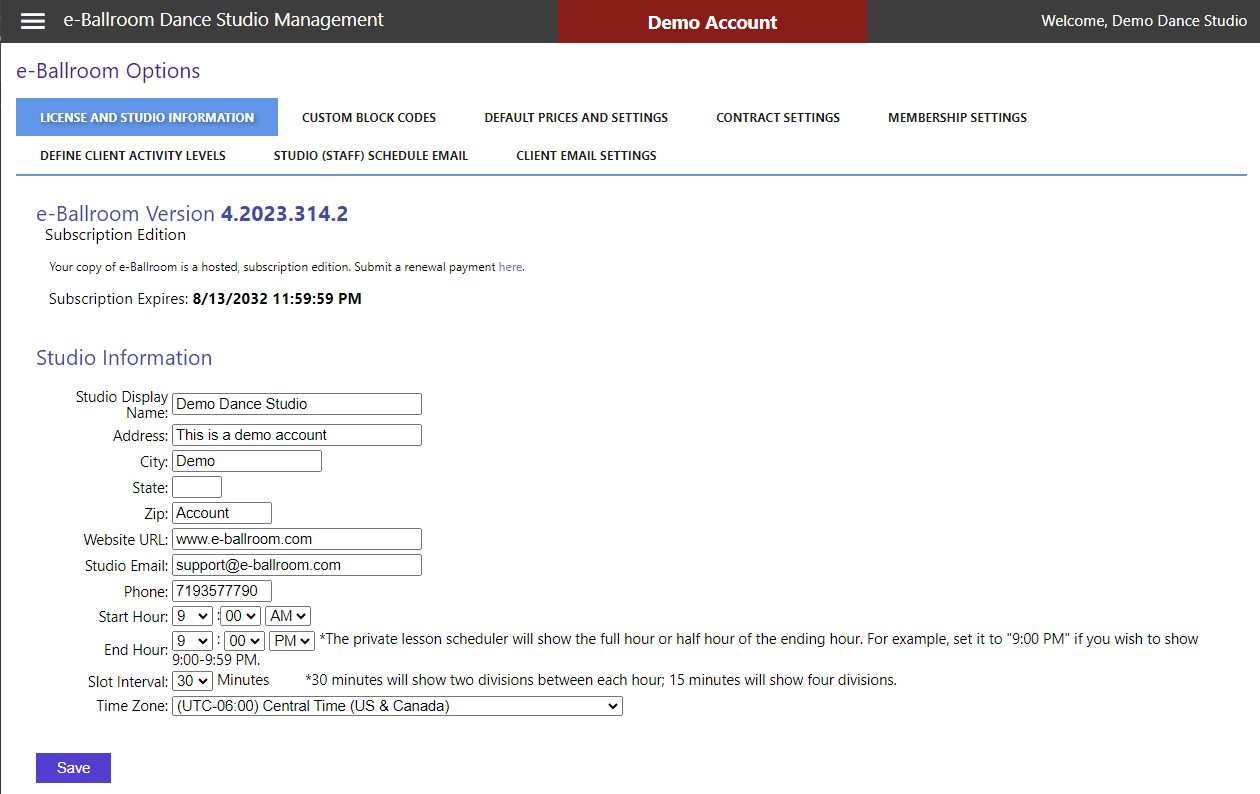
Under “Subscription Edition”, you will see when your subscription (or trial) expires. As your expiration date nears, you will receive an alert balloon upon login on indicating that you need to contact us to renew. We’ll also reach out to you via email and phone to handle your renewal or purchase.
Under “Studio Information”, you will want to provide your contact information as shown above as this information is used when printing reports and when sending email notifications to instructors and clients.
Remember, press “Save” before moving to another tab if you have made changes. See the next page for notes on the Start Hour/End Hour/Slot Interval.
Start Hour, End Hour, and Slot Intervals for the Private Lesson Scheduler
In the same section above, you will see the start hour, end hour, and slot interval. Here, you will want to set the start hour to the first hour of the day that your instructors are available to teach private lessons. You will want to set the end hour to an hour after your last available private lesson.
For instance, if your instructors are available to hold a private lesson at 9 PM, you should set the End Hour to 10 PM. This allows you to display 9:00 to 9:59 PM on the calendar.
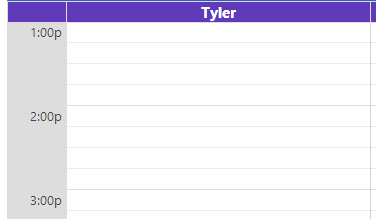
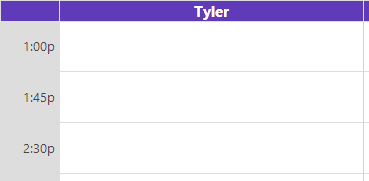
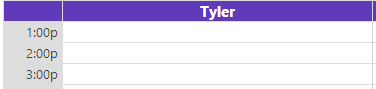
Slot Interval
The slot interval sets the number of “divisions” between each hour on the calendar. Remember, lessons can be of a variable duration, but the way the calendar is displayed is up to you. Examples of the various slot intervals are shown below.
| 30 Minute Slot Interval | 15 Minute Slot Interval |
|---|---|
 |
 |
| 45 Minute Slot Interval | 1 Hour Slot Interval |
 |
 |
| 90 Minute Slot Interval | |
 |
Default Prices and Contract Settings
Click on the “Default Prices and Contract Settings” tab. A screen similar to the one below will appear. The “Master” price levels, highlighted in the diagram, are used by default for instructors that are marked as “Master Level”. The “Values” column on the right correspond to contracts/packages. These default prices can be adjusted at check in.
When scheduling private lessons, you can also set a default lesson type. Our standard setting is for “Pay As You Go”. The top most highlighted field allows you to change this based on your billing model. For this example, we are using “Contract/Package Lesson” type.
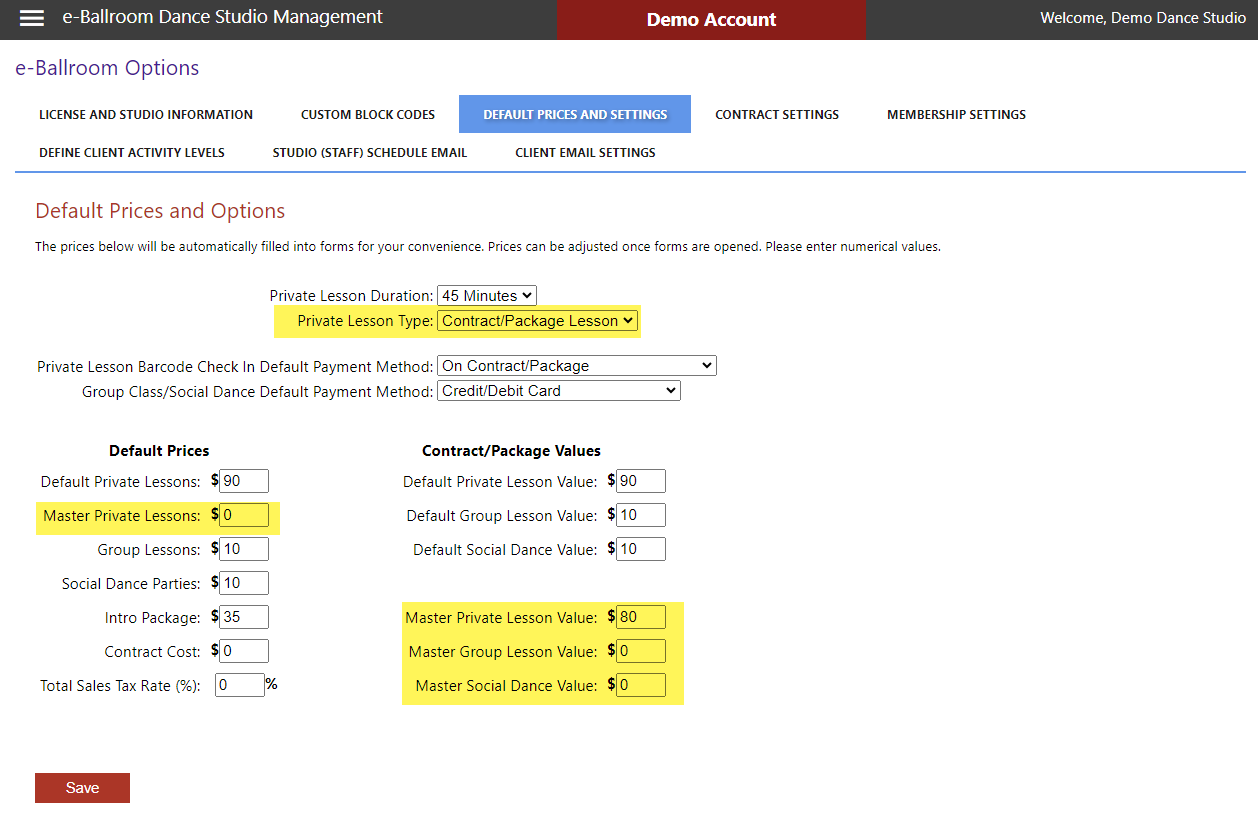
Press “Save” to make these changes. You’ll see the defaults appear throughout the program. Note, the cost for private lessons, group lessons, and social dance parties are for “pay as you go” items. They are not utilized if you are using a contract/package.
Changing the Default Payment Method for Group Classes and Social Dances
The option “Group Class/Social Dance Default Payment Method” changes the default payment method for group classes and social dances, within the check-in interface, from “Cash” to your preferred default.
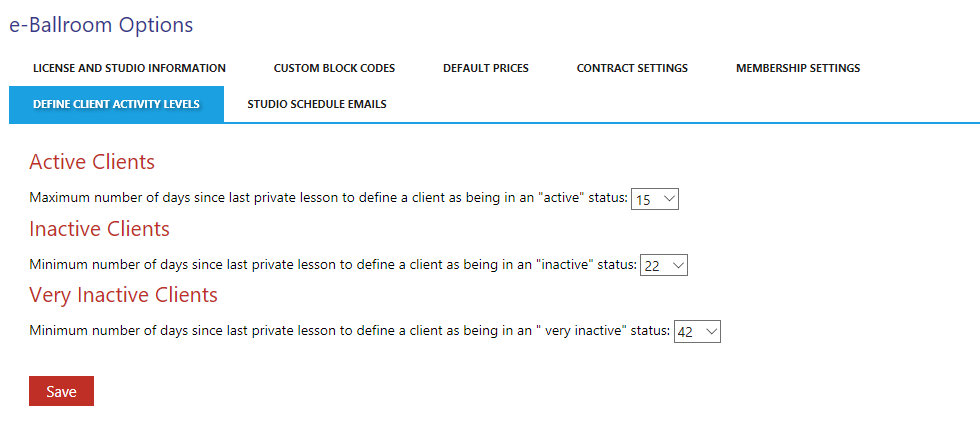
Client Activity Levels
e-Ballroom’s active/inactive/very inactive client lists are calculated based on when a customer has last completed (i.e. checked in) to a private lesson. You can customize the number of days since the last private lesson to indicate if a client is active/inactive/very inactive under the tab of “Define Client Activity Levels”. Press “Save” when complete.
Note: These reports are calculated on the fly so you can re-run them after changing these settings and they will always be up to date.
Step 3: Adding New Clients
In order to utilize e-Ballroom’s core features, you’ll need to have clients within the system! Once you have them added, your account will be operational and ready for scheduling, financial tracking, and more. To view how to add new clients, continue on to the next section of this help guide.